To view all Revo Uninstaller Pro’s Options, click the Menu button ![]() in the top right corner, and select Options.
in the top right corner, and select Options.
- 6.1 GENERAL
- 6.2 UNINSTALLER
- 6.3 ALL PROGRAMS
- 6.4 TRACED PROGRAMS
- 6.5 LOGS DATABASE
- 6.6 GROUPS MANAGER
- 6.7 JUNK FILES CLEANER
- 6.8 VIEW
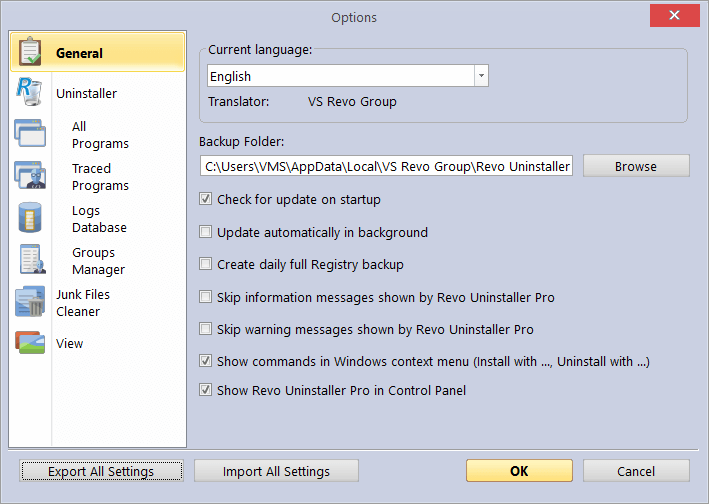
Provides general options for Revo Uninstaller Pro:
- Current Language: drop down menu with all available languages for Revo Uninstaller Pro’s user interface. Note that if you had selected a specific language at the beginning of Revo Uninstaller Pro’s installation, that language will be automatically selected here.
- Backup Folder: – the folder where all backups are stored. You can change it if the currently used drive has little or no more free space.
- Check for update on startup – enables Revo Uninstaller Pro to check if there is a new version available, by connecting to www.revouninstaller.com on startup, but only once a day. No personal information is sent. Note that you have to allow Revo Uninstaller Pro to connect to the Internet in your firewall.
- Update automatically in background – enables automatic download and update of Revo Uninstaller Pro. You will be notified on the next startup of the program if such updated had occurred.
- Create daily full Registry backup – enables Revo Uninstaller Pro to create a full Registry backup once per day, the first time it is started during said day.
- Skip information messages shown by Revo Uninstaller Pro – if you do not want to see information messages from Revo Uninstaller Pro, enable this option. Information messages are for example: “Revo Uninstaller Pro finished scanning for leftovers”.
- Skip warning messages shown by Revo Uninstaller Pro – if you do not want to see warning messages from Revo Uninstaller Pro, enable this option. Warning messages are for example: “Are you sure you want to remove selected item?”
- Show commands in Windows context menu (Install with …, Uninstall with…) – Revo Uninstaller Pro adds the following options to the Windows context menu (right click on a file or folder):
- Install with Revo Uninstaller Pro;
- Uninstall with Revo Uninstaller Pro (for folders only).
If you want to remove these options from the context menu, uncheck this option. Because Windows shell extensions are loaded into memory, a system restart will be required for the change to take effect.
- Show Revo Uninstaller Pro in Control Panel – enable this option if you want to place a Revo Uninstaller Pro icon in your Control Panel, acting as a shortcut to launch the program.
6.2.1 GENERAL
Here are the main options affecting the whole uninstaller…
- Set the focus on “Traced Programs” on startup – when Revo Uninstaller Pro is started, the All Programs tab is shown by default; by enabling this option, Traced Programs will be shown instead.
- Make a System Restore Point before uninstall – if Windows System Restore is enabled, Revo Uninstaller Pro sends a request to it to create a System Restore Point.
- Create a full Registry Backup before uninstall – if the option is enabled, Revo Uninstaller Pro creates a full Registry backup, which you can use to restore from via the Windows Recovery Console.
- Backup deleted Registry items – this option will cause all changes to the Windows Registry to be backed up. The backups can be restored from Backup Manager.
- Show check boxes in Details view – if enabled, modules that have Details view (All Programs, Traced Programs, Windows Apps, Browser Extensions) and it is used, Revo Uninstaller Pro will display a check box for each entry for easier selection of multiple items.
- Forcibly stop running executable files during their uninstall – if this is enabled, and Revo Uninstaller Pro is trying to uninstall an executable file(s), then it will try to stop that file(s) forcibly. This will prevent some running files from remaining on the system until the next restart, or even after that.
- Backup deleted Registry items – this option will cause all changes to the Windows Registry to be backed up. The backups can be restored from the Backup Manager.
- Delete files and folders:This option controls how Revo Uninstaller Pro handles the deletion of files:
- to the Backup folder – all deleted files are backed up to Revo Uninstaller Pro’s own backup folder. While this option is the most secure as it ensures you will always have a backup, it can also require a lot of hard drive space if the deleted leftovers files are many and/or large.
- to the Recycle Bin – moves all deleted leftovers to the Recycle Bin. This is the default option. You can easily restore any deleted leftover file until you empty the Recycle Bin, then you would need to use dedicated recovery software if you wish to restore any deleted files.
- Permanently – all leftover files and folders are deleted permanently, so you cannot restore them easily later. You would need to use dedicated recovery software if you wish to restore any deleted files.
- Show as new programs installed: Control how recently installed a program must be in order for it to be listed in the “New Programs” section of All Programs.
- Last (in days) – you can specify how many days after a program’s installation it should be considered as a new program.
- Since the last start of the uninstaller – a program is shown as new only once – the first time Revo Uninstaller Pro is run after the program’s installation; after that it is no longer considered new.
Options here are related to the All Programs tab in the Uninstaller.
6.3.1. GENERAL
- Show system updates – enables the listing of Windows updates;
- Show system components – some programs have additional components, which are removable but marked as a component of another program, and by default, Revo Uninstaller Pro does not list these kind of programs.
- Use program’s uninstall data to get the Install Date property – if this option is enables, Revo Uninstaller Pro reads the installation dates of installed programs from their own uninstallation data in the their uninstallation Registry key. Otherwise, Revo Uninstaller Pro reads the installation date from the Registry in its own, proprietary way.
- Only run the built-in uninstaller – disables scanning when uninstalling a program.
- Search for an appropriate log before program’s regular uninstall – if this option is enables, when uninstalling a program through the All Programs module, Revo Uninstaller Pro will search for an appropriate log among your logs and the logs in the Logs Database, in order to do a better uninstallation.
- Open the Uninstall wizard maximized – enabling this option will make the window containing leftovers to always be shown maximized, for better review of the listed items.
- Check mark all leftovers by default – leftovers such as Registry entries, files, and folders found by Revo Uninstaller Pro will be checked/selected automatically.
NOTE: When you click the Delete button, items that are both checked and in bold will be deleted, even if all items have check marks!
- Show the option to scan all Windows accounts for leftovers – if enabled, when you chose the Advanced scanning mode for leftovers during uninstall, Revo Uninstaller Pro will show an additional option to scan all Windows accounts for leftovers of the program being uninstalled.
- Rebuild cache file – this option rebuilds cache file, which contains data about the installed programs. Revo Uninstaller Pro re-reads the information in the Registry, and re-creates the cache file. This will also remove any customization you may have made: comments, custom icons, and groups.
6.3.2. REGISTRY
When a program from the All Programs tab is uninstalled, Revo Uninstaller Pro shows the leftover Registry entries and some of the items we know for sure that are not created by the uninstalled program, so we have an exclude list for these items. You are also able to add or remove such items (using Add and Remove buttons), to restore the default list of exclusions by clicking Reset Defaults.
IMPORTANT: Adding an item is a safe option. Check carefully before removing items since errors can be expensive.
A Registry key can be excluded only by adding the full path to the key. For example:
- HKEY_LOCAL_MACHINE\SOFTWARE\Classes
There is an option for each Registry key called Include Sub keys. It will exclude all sub-keys of that Registry key as well.
In front of each Registry key there is a check box, which is used to enable or disable the exclusion of the corresponding Registry key. If there is a check mark, the key is excluded.
The exclusion list supports wildcards, such as (?) and (*), which means you can exclude several keys at once, or without knowing the exact name of a particular key. For example:
- HKEY_LOCAL_MACHINE\SOFT????\Classes
This will exclude all Registry keys inside HKEY_LOCAL_MACHINE, beginning with “SOFT” and having exactly four characters after “SOFT”, because the (?) sign means any character.
- HKEY_LOCAL_MACHINE\SOFT*\Classes
This will exclude all Registry keys inside HKEY_LOCAL_MACHINE, beginning with “SOFT”, regardless how many characters there are after “SOFT” and what they are, because the * character means anything/everything. For example:
- HKEY_LOCAL_MACHINE\*\Classes
- This will exclude all keys that are inside HKEY_LOCAL_MACHINE, and that have sub-keys “Classes”. i.e. the following keys will be exluced:
- HKEY_LOCAL_MACHINE\SOFTWARE\Classes
- HKEY_LOCAL_MACHINE\HARDWARE\Classes
- HKEY_LOCAL_MACHINE\Microsoft\Classes
- HKEY_LOCAL_MACHINE\Your Company\Classes
- HKEY_LOCAL_MACHINE\Anything goes here\Classes
You can also use a combination of (?) and (*).
6.3.3. FOLDERS
It is also possible to exclude folders from the leftover scans. From the Folders tab, you can add or remove folders to the exclusion list using the Add and Remove buttons, or restore the default list of exclusions by clicking Reset Defaults.
6.4.1. GENERAL
When you install a program through Revo Uninstaller Pro, it creates a log file. These log files are saved to a default folder, which can be changed if needed. The Logs Folder: field shows the current path to the logs; it can be changed to a different folder by typing the path manually, or by clicking the Browse button, and selecting the new folder.
- Delete traced program log after uninstall – if the option is enabled, after a program is uninstalled using a log file via the Uninstall command (not the Custom Uninstall command), the log file used is deleted.
- Trace programs in compact window mode – by default, when tracing a program installation, the trace bar is located at the top of the screen and runs across the entire screen. Enabling this option switches to a smaller, floating trace bar that is on top of all other windows. Use this if you dislike the default behavior, or if you are having problems with it.
If necessary, the buttons in the “All logs operations on the current computer” group can be used to Transfer, Backup and Restore all logs on file:
- Transfer – when the user has an installed version of Revo Uninstaller Pro, you can transfer (copy) all the logs from the installed version to a Portable version owned.
- Backup – makes a backup of all traced logs in a .ruplogs format
- Restore – restores all logs from a previous backup in .ruplogs format
6.4.2. EXCLUDE
- Registry Keys to Exclude – When a program is uninstalled, Revo Uninstaller Pro shows the leftover Registry entries. It also lists items that we definitely know are not created by the uninstalled program, and so we have created an exclude list for these items. Add or remove such items using the Add and Remove buttons, or restore the default list of exclusions by clicking Reset Defaults.
When a program from the All Programs tab is uninstalled, Revo Uninstaller Pro shows the leftover Registry entries and some of the items we know for sure that are not created by the uninstalled program, so we have an exclude list for these items. You are also able to add or remove such items (using Add and Remove buttons), to restore the default list of exclusions by clicking Reset Defaults.
A Registry key can be excluded only by adding the full path to the key. For example:
- HKEY_LOCAL_MACHINE\SOFTWARE\Classes
There is an option for each Registry key called Include Sub keys. It will exclude all sub-keys of that Registry key as well.
In front of each Registry key there is a check box, which is used to enable or disable the exclusion of the corresponding Registry key. If there is a check mark, the key is excluded.
The exclusion list supports wildcards, such as (?) and (*), which means you can exclude several keys at once, or without knowing the exact name of a particular key. For example:
- HKEY_LOCAL_MACHINE\SOFT????\Classes
This will exclude all Registry keys inside HKEY_LOCAL_MACHINE, beginning with “SOFT” and having exactly four characters after “SOFT”, because the (?) sign means any character.
- HKEY_LOCAL_MACHINE\SOFT*\Classes
This will exclude all Registry keys inside HKEY_LOCAL_MACHINE, beginning with “SOFT”, regardless how many characters there are after “SOFT” and what they are, because the * character means anything/everything. For example:
- HKEY_LOCAL_MACHINE\*\Classes
This will exclude all keys that are inside HKEY_LOCAL_MACHINE, and that have sub-keys “Classes”. i.e. the following keys will be excluded:
- HKEY_LOCAL_MACHINE\SOFTWARE\Classes
- HKEY_LOCAL_MACHINE\HARDWARE\Classes
- HKEY_LOCAL_MACHINE\Microsoft\Classes
- HKEY_LOCAL_MACHINE\Your Company\Classes
- HKEY_LOCAL_MACHINE\Anything goes here\Classes
You can also use a combination of (?) and (*).
In case you see in your logs files and/or folders that shouldn’t be deleted, the best approach is to find out which process is responsible for their addition to the log, and exclude said process by adding it to the exclusion list. You are also allowed to add specific files and folders to be excluded from the logs. Using the Add and Remove buttons in the Files and Folders to Exclude section.
- Files and Folders to Exclude – add specific files and folders to be excluded from the logs by using the Add and Remove buttons.
6.4.3. PROCESSES
When a program is installed through Revo Uninstaller Pro, some of processes should always be monitored and logged. You can add processes to be included in the monitoring using by clicking the Add button, and either specifying the full path to the process, or clicking Browse, and selecting it. You can also Remove added processes, or just uncheck them. The Reset Defaults button will remove all added processes by the user, while simultaneously restoring the default ones.
Exclude Processes works in the same way as Include Processes, except that processes in this list are not monitored during the installation of programs.
Options here are related to the Logs Database Module.
Automatically update Logs Database – if this option is checked, the local database file that contains the available logs is automatically updated. From here, you can always update it manually by clicking the Update Now button. You can also see the current version of the database file on your computer and the latest version of the database stored on our server.
The Groups Manager shows all available groups for both All Programs and Traced Programs. The group order is important because it is considered during program listing – the groups are shown in All Programs and Traced Programs in the same order they are listed in the Groups Manager. Clicking the header of the list will sort all groups alphabetically. You can use the Move Up and Move Down buttons to change the order of the groups to your liking. There are also other buttons:
- Add – used to add a new group by entering its name;
- Rename – used to rename a listed group by selecting it first;
- Remove – used to remove a group by selecting it first;
- Reset Defaults – removes all created groups and sets the default groups of Revo Uninstaller Pro, which are Internet, Games, Multimedia and Utilities.
6.7.1. GENERAL
Delete files to the Recycle Bin – if this option is enabled, all junk files are moved to the Recycle Bin, instead of being deleted permanently. This can be considered as an additional safety measure, but will not free up disk space until you empty the Recycle Bin.
Ignore files accessed in the last 24 hours – this option is enabled by default because some junk and temporary files are in use during the scan, so it is better to ignore them.
There is a list of patterns (mostly file types), and their description, where you can select which pattern to look for when scanning for junk files. Files, matching a given pattern, will be shown in the results list only if corresponding pattern is checked (enabled).
You can also add or remove patterns by using the buttons underneath.
- To add a new pattern, click the Add button. A small window will appear, where you can type the desired pattern using wild cards (?) and (*).
- To remove a pattern, select it in the list, and click the Remove button.
- If you want to restore the default built-in patterns, just click the Set Default button, which will delete all user created patterns, and restore the default ones.
6.7.2. EXCLUDE
If you wish to exclude any files contained within a directory from a junk scan, there is a list of patterns of paths on the local drives, where you can select which pattern (folder) to be skipped when scanning for junk files. Directories matching a given pattern will be skipped during the scan process only if corresponding pattern is checked (enabled).
You can also Add or Remove patterns by using the buttons underneath.
- To add a new pattern, click the Add button. A small window will appear, where you can type the desired pattern using wild cards (?) and (*).
- To remove a pattern, select it in the list, and click the Remove button.
If you want to restore the default built-in patterns, just click the Reset Defaults button, which will delete all user created patterns, and restore the default ones.
6.7.3. INCLUDE
In the Include tab, you can add folders, whose entire content is to be considered junk during a scan, thus also deleted.
NOTE: all files contained in the explicitly included directories will be considered junk, regardless of their extensions, so be careful to include only such folders, for which you are certain they do not contain any actual, personal data.
Some visual aspects of Revo Uninstaller Pro can be changed and adjusted here.
6.8.1. GENERAL
Show small icons in Details view if you want to view small icons in the Details view of the Uninstaller modules and the Autorun Manager.
Show startup splash screen – enables or disable the splash screen shown while Revo Uninstaller Pro is loading. This will not speed up the loading process, only remove the splash screen.
Reset main window panels settings – resets the position and size of the panels in the main Revo Uninstaller Pro window – control bars, status bar, description panel, etc.
Reset Details view control settings – resets any customization (all column changes) of the Details view mode for modules that use it: All Programs, Traced Programs, Autorun Manager, etc.
6.8.2. THEME
Revo Uninstaller Pro supports basic themes, which can be changed here. There is a drop-down menu, from which you can choose from several pre-defined visual themes. If you want to limit the theme selection only to dark themes, check the Dark Mode option.
Dialogs background color – lets you choose a custom color for the background of all windows in Revo Uninstaller Pro.
Text color – changes the text color of almost all of the user interface elements in the program.
Controls background color – changes the background color of most of the lists and controls that contain text in the program.
Selection Color – lets you choose a custom color for all selected elements in different controls and lists in Revo Uninstaller Pro.
Command button text color – changes the text color of the action buttons on the left side of any open tool.