- 5.1 AUTORUN MANAGER
- 5.2 JUNK FILES CLEANER
- 5.3 WINDOWS TOOLS
- 5.4 HISTORY CLEANER
- 5.5 EVIDENCE REMOVER
- 5.6 UNRECOVERABLE DELETE
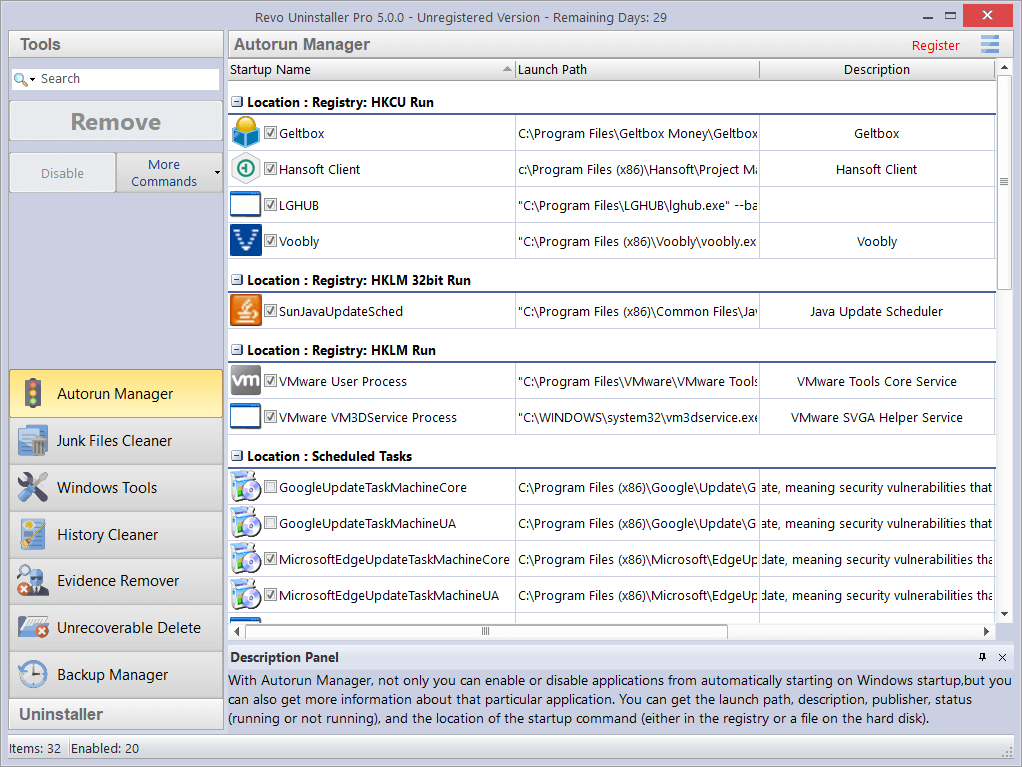 The most common task will be to Enable or Disable an application from auto starting. Simply check or uncheck the box in front of the application name. Job done. The alternative is to Remove a program. This will both disable and remove it from the list.
NOTE: It is recommended to simply Disable a program and watch for unwanted consequences before deleting. The process is easily reversed (just check the box again). Remove a program only if you are certain it will not have a negative impact.
Click More commands to access additional options.- Run process – starts the selected program/process if it is not RUNNING.
- Kill process – forcibly stops a program if it is RUNNING.
- Export List to – allows you to export the autorun list to TXT, HTML, or XLS (Microsoft Excel spreadsheet). You can choose which details/columns to include in the exported file.
To export to an XLS file, you must have Microsoft Excel installed and working properly.
- Print – allows you to print the autorun list.
- Add – allows you to manually add a program for automatic startup with the operating system.
- Name – the name of program, which will appear in the Autorun Manager.
- Command (full path) – full path to the program you want to run automatically. You can also add parameters for the executable, but if you do so, put the path in quotations marks. For example:“C:\Program Files\VS Revo Group\Revo Uninstaller Pro\RevoUninPro.exe“ /hunter
- All users – if you want that program to start when any user logs in.
- Current user – if you want that program to start only when the current user logs in.
- Registry: Run – on every startup of Windows – this option will add a startup entry to the Windows Registry, which is a very common location for automatic startups.
- Registry: RunOnce – only once on the next startup of Windows – also adds a startup entry in the Windows Registry, but it will start the program only once, after which the startup value in the Registry is deleted automatically by Windows.
- Startup Folder – on every startup of Windows – this option will add a shortcut to the program in the Startup folder, which is also a common location for startups.
NOTE: It is accessible from Windows Explorer:
C:\Users\[YOURPROFILE]\AppData\Roaming\Microsoft\Windows\Start Menu\Programs\Startup\.NOTE: The AppData folder is hidden so you may need to show the hidden files and folders.
- Refresh – reload the autorun list.
- Run Process – starts the selected program/process if it is not RUNNING.
- Kill Process – forcibly stops a program if it is RUNNING.
- Search at Google for – use it to search online using Google for the autorun item’s name, file name, publisher, or description. This will open your default web browser and display the results of the search.
- Open containing folder – opens the folder containing the selected item in Windows Explorer.
- Go to Location – opens the location of the autorun entry, which can be a Registry entry, a shortcut in the Startup folder, etc.
- Copy Launch Path – copies the launch path to the Windows clipboard so you can paste it in a text file, e-mail, chat message, etc.
- Remove selected – removes the selected autorun item; the same as selecting it, and clicking the Remove button, as described above.
- Remove all invalid – removes all autorun items that are detected as invalid, i.e. there is an autorun entry but it does not seem to point to an existing process or program.
- Remove all disabled – remove all autorun items that are currently disabled (unchecked).
- Properties – shows the file’s properties in Windows Explorer.
- Open Windows Services – starts the Windows Services manager (services.msc) for more in-depth control over the services.
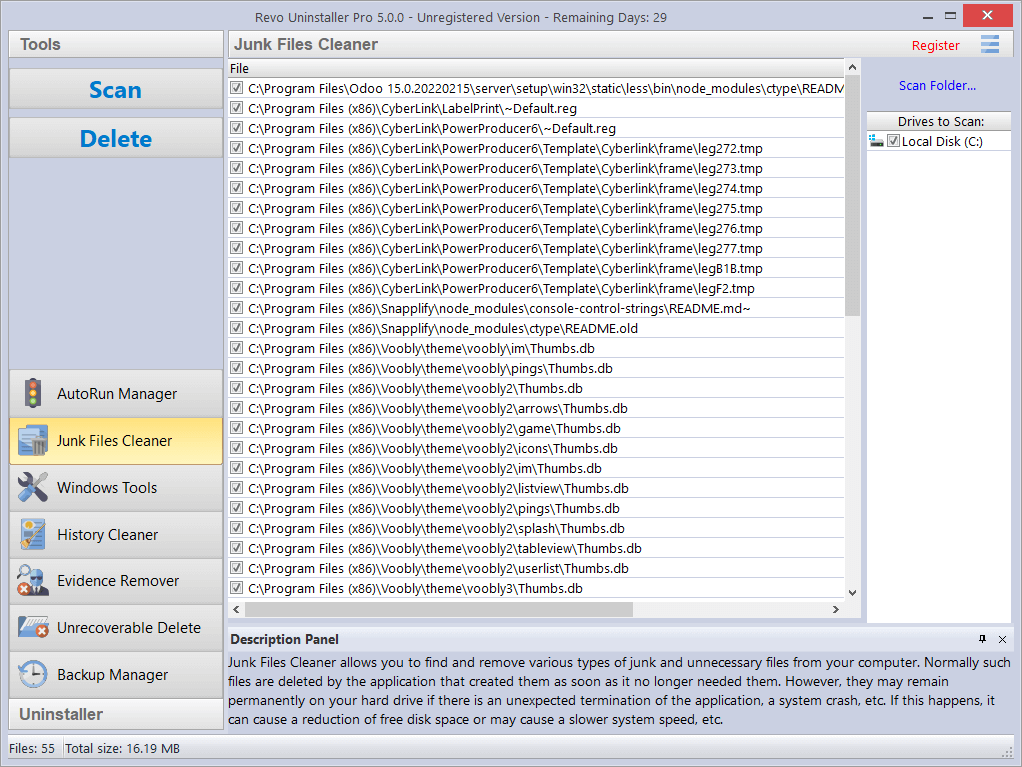 Available commands for the Junk Files Cleaner:
- Scan – performs a scan with your current settings. A small window will appear while the scanning is in progress. You can cancel the scan by clicking the Cancel button, and you will be presented with a list of files found up until that point.
- Delete – deletes all found junk files that have a check mark, after the scan is completed or canceled.
- Open – opens the selected file, as if you have double clicked it.
- Search at Google for – use it to search online using Google for name of the selected file. This will open your default web browser and display the results of the search.
- Open containing folder – opens the folder containing the selected item in Windows Explorer.
- Properties – shows the file’s properties in Windows Explorer.
- Check all items – puts a check mark for all files in the list.
- Uncheck all items – removes the check marks for all files in the list.
- Check all selected items – puts a check mark for all selected files in the list.
- Uncheck all selected items – removes the check marks for all selected files in the list.
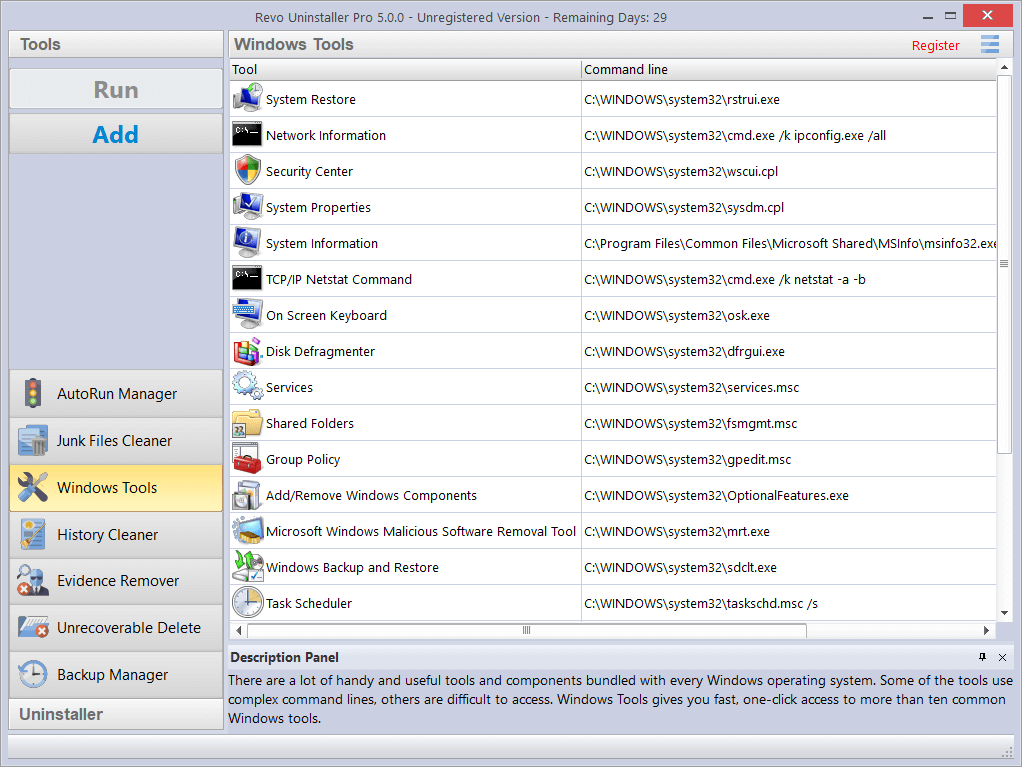
Windows Windows Tools | 7 | 8(Pro) | 8.1 | 10 | 11 | Server 2012 R2 | |||||
|---|---|---|---|---|---|---|---|---|---|---|---|
| № | x86 | x64 | x86 | x64 | x86 | x64 | x86 | x64 | x64 | x64 | |
| 1 | System Restore | ✓ | ✓ | ✓ | ✓ | ✓ | ✓ | ✓ | ✓ | ✓ | |
| 2 | Network Infromation | ✓ | ✓ | ✓ | ✓ | ✓ | ✓ | ✓ | ✓ | ✓ | ✓ |
| 3 | Security Center | ✓ | ✓ | ✓ | ✓ | ✓ | ✓ | ✓ | ✓ | ✓ | |
| 4 | System Properties | ✓ | ✓ | ✓ | ✓ | ✓ | ✓ | ✓ | ✓ | ✓ | ✓ |
| 5 | System Information | ✓ | ✓ | ✓ | ✓ | ✓ | ✓ | ✓ | ✓ | ✓ | ✓ |
| 6 | TCP/IP Netstat Command | ✓ | ✓ | ✓ | ✓ | ✓ | ✓ | ✓ | ✓ | ✓ | ✓ |
| 7 | On-Screen Keyboard | ✓ | ✓ | ✓ | ✓ | ✓ | ✓ | ✓ | ✓ | ✓ | ✓ |
| 8 | Disk Defragmenter | ✓ | ✓ | ✓ | ✓ | ✓ | ✓ | ✓ | ✓ | ✓ | ✓ |
| 9 | Services | ✓ | ✓ | ✓ | ✓ | ✓ | ✓ | ✓ | ✓ | ✓ | ✓ |
| 10 | Shared Folders | ✓ | ✓ | ✓ | ✓ | ✓ | ✓ | ✓ | ✓ | ✓ | ✓ |
| 11 | Group Policy | ✓ | ✓ | ✓ | ✓ | ✓ | ✓ (Pro) | ✓ | ✓ | ✓ | ✓ |
| 12 | Add/Remove Windows Components | ✓ | ✓ | ✓ | ✓ | ✓ | ✓ | ✓ | ✓ | ✓ | |
| 13 | Microsoft Windows Malicious Software Removal Tool | ✓ | ✓ | ✓ | ✓ | ✓ | ✓ | ✓ | ✓ | ||
| 14 | Windows Backup and Restore | ✓ | ✓ | ✓ | ✓ | ✓ | ✓ | ✓ | ✓ | ✓ | |
| 15 | Task Scheduler | ✓ | ✓ | ✓ | ✓ | ✓ | ✓ | ✓ | ✓ | ✓ | ✓ |
| 16 | Check Disk | ✓ | ✓ | ✓ | ✓ | ✓ | ✓ | ✓ | ✓ | ✓ | ✓ |
| 17 | System File Checker | ✓ | ✓ | ✓ | ✓ | ✓ | ✓ | ✓ | ✓ | ✓ | ✓ |
| 18 | Disk Cleanup | ✓ | ✓ | ✓ | ✓ | ✓ | ✓ | ✓ | ✓ | ✓ | ✓ |
| 19 | Resource Monitor | ✓ | ✓ | ✓ | ✓ | ✓ | ✓ | ✓ | ✓ | ✓ | ✓ |
| 20 | DISM | ✓ | ✓ | ✓ | ✓ | ✓ | ✓ | ✓ | ✓ | ||
| 21 | Fush DNS cache | ✓ | ✓ | ✓ | ✓ | ✓ | ✓ | ✓ | ✓ | ✓ | ✓ |
| 22 | DirectX | ✓ | ✓ | ✓ | ✓ | ✓ | ✓ | ✓ | ✓ | ✓ | ✓ |
5.3.1. SYSTEM RESTORE
System Restore lets you revert your computer to a previous state if a problem occurs, without losing any personal data files (including documents, images, videos, music, browsing history, drawings, favorites, e-mails, etc.). System Restore creates snapshots of the most vital areas of the system, called Restore Points. They are created both daily and when significant system events occur (for example: when a program or driver is installed, when Windows updates are installed, etc.). You can also create Restore Points manually.NOTE: By default, Revo Uninstaller Pro creates a Windows Restore Point at the start of any uninstall operation (before deleting any data).
5.3.2. NETWORK INFORMATION
Network Information is used to display all current TCP/IP network configuration values, refresh Dynamic Host Configuration Protocol (DHCP) and Domain Name System (DNS) settings, Displays the full TCP/IP configuration for all adapters including IP address, MAC address, subnet mask, default gateway, Windows Internet Naming Service (WINS) and DNS configuration. Adapters can represent physical interfaces, such as installed network adapters, or logical interfaces, such as dial-up connections.5.3.3. SECURITY CENTER
Security Center is used to check the security status of your computer’s firewall, virus protection software, and automatic Windows updates. If a problem is detected with any of them (for example if your antivirus program is out of date), the Security Center alerts you and provides recommendations on how to better protect your computer.5.3.4. SYSTEM PROPERTIES
System Properties lets you:- View basic information such as your CPU and amount of memory (RAM).
- View and change settings that control how your computer uses memory and finds certain information.
- Find information about hardware and device properties, as well as configure hardware profiles.
- View information about your network connection and logon profile.
- Report system and program errors to Microsoft or your system administrator when they occur.
5.3.5. SYSTEM INFORMATION
System Information collects and displays system configuration information for local and remote computers. This includes information about hardware configurations, computer components, and software, including signed and unsigned drivers.5.3.6. TCP/IP NETSTAT COMMAND
The TCP/IP Netstat Command displays all active TCP connections and the TCP and UDP ports, on which the computer is listening, and displays the executables involved in creating each connection or listening port. In this case, the executable name is in [ ] at the bottom, on top is the component it called, and so forth until TCP/IP was reached. In other words, this command shows which applications are using which port to connect to the Internet, and which applications are listening for incoming connections.5.3.7. ON-SCREEN KEYBOARD
On-Screen Keyboard is a virtual keyboard, shown on the screen, allowing users with mobility impairments to type data using a pointing device or joystick. You can also use On-Screen Keyboard if you think that there is a keylogger installed on your computer, and all the keys you type are being recorded, as it eliminates the possibility of recording typed keys. The On-Screen Keyboard can also be used as a temporary/emergency workaround, if you do not have a real keyboard for the moment but you need to be able to type.5.3.8. DISK DEFRAGMENTER
Disk Defragmenter analyzes local volumes and consolidates fragmented files and folders so that each occupies a single, contiguous space on the volume. As a result, your system can access files and folders and save new ones more efficiently. By consolidating your files and folders, Disk Defragmenter also consolidates a volume’s free space, making it less likely that new files will be fragmented. The process of consolidating fragmented files and folders is called defragmentation. After defragmentation, your hard disk drive will be well arranged and your system will work faster.5.3.9. SERVICES
A service is a type of application that runs in the background. Services typically provide features such as client/server applications, Web servers, database servers, and other server-based applications to users, both locally and across a network. You can use the Services component to:- Start, stop, pause, resume, or disable a service on remote and local computers. You must have the appropriate permissions.
- Manage services on local and remote computers.
- Set up recovery actions to take place if a service fails; for example, restarting the service automatically or restarting the computer.
- Enable or disable services for a particular hardware profile.
- View the status and description of each service.
5.3.10. SHARED FOLDERS
Shared Folders is used to manage shared resources over a network, control user access permissions, session activity, shared resource properties, and to view a summary of connections and resources, uses for local and remote computers. With Shared Folders, you can:- Create, view, and set permissions for shared resources.
- View a list of all users connected over a network to the computer, and disconnect one or all of them.
- View a list of files that have been opened by remote users, and close one or all of the open files.
5.3.11. GROUP POLICY
Group Policy is a component that includes policy settings for user configurations, which affect users, and for computer configurations, which affect computers (all users). Group Policy settings define the various components of the user’s desktop environment that a system administrator needs to manage, for example, the programs that are available to users, the programs that appear on the user’s desktop, and options for the Start menu. To create a specific desktop configuration for a particular group of users, use the Group Policy snap-in.5.3.12. ADD/REMOVE WINDOWS COMPONENTS (WINDOWS FEATURES)
Add/Remove Windows Components (also known as Windows Feature) helps you manage installed Windows components on your computer. After Windows is installed, you can use the Add/Remove Windows Components (Windows Features) to add a Windows component that was not included in the original installation, or to remove an existing Windows component that you no longer require.5.3.13. MICROSOFT WINDOWS MALICIOUS SOFTWARE REMOVAL TOOL
The Microsoft Windows Malicious Software Removal Tool checks your computer for infections by specific, prevalent malicious software, and helps remove any infections found. This malicious software includes viruses, worms, and Trojan horses. When the detection and removal process is complete, the tool displays a report describing the outcome, including, if any malicious software was detected and removed.5.3.14. WINDOWS BACKUP AND RESTORE
Windows Backup and Restore lets you make backup copies of personal data files for all users of the computer. You can let Windows choose what to back up or you can select the individual folders, libraries, and drives you want to back up. It also lets you create a system image which includes Windows and your system settings, programs, and files. You can use a system image to restore the contents of your computer should your hard drive or computer ever stop working.5.3.15. TASK SCHEDULER
Task Scheduler helps you schedule automated tasks that perform actions at a specific time, or when a certain event occurs. It provides the ability to schedule the launch of programs or scripts at pre-defined times, or after specified time intervals. Task Scheduler maintains a library of all scheduled tasks, providing an organized view of the tasks and a convenient way to manage them.5.3.16. CHECK DISK
Check Disk opens a command prompt window to execute the chkdsk.exe Windows command. Check Disk verifies the logical integrity of the file system on the Windows volume. Check Disk checks for problems related to bad sectors, lost clusters, cross-linked files, and directory errors. These types of problems can be caused by system crashes or freezes, power glitches, incorrectly turning off a computer, etc.5.3.17. SYSTEM FILE CHECKER
System File Checker allows you to scan for and restore corruptions in Windows system files, verifying their versions. If it finds a problem, it will attempt to replace the problematic files from the Windows DLL Cache. If the file is not in the Windows DLL Cache or the DLL Cache is corrupted, you may be prompted to insert the Windows installation disk.5.3.18. DISK CLEANUP
Disk Cleanup is a computer maintenance utility designed to free up disk space on your computer hard drive. It allows users to removes files that are no longer needed or that can be safely deleted like temporary, cache, and log files created by the operating system and other programs.5.3.19. RESOURCE MONITOR
Resource Monitor displays information about the use of hardware (CPU, memory, disk, and network) and software (file handles and modules) resources in real time. This tool helps you find how much of resources are being put to use at the moment or used over time through a graphical representation. This way, you can check the performance counters of specific resource and decide a course of action to improve the performance of the computer.5.3.20. DEPLOYMENT IMAGE SERVICING AND MANAGEMENT (DISM)
DISM is a command-line tool, as implemented in Revo Uninstaller Pro’s Windows Tools, performs a general scan for corruption, and attempts repairs of common issues it finds within the system image of the operating system.5.3.21. FLUSH DNS CACHE
The flush DNS cache command may help if you are having trouble accessing a web page or using an online service, as it is possible be that your device has cached an out of date DNS record that needs to be manually cleared or reset.5.3.22. DIRECTX INFO AND DIAGNOSTIC
The DirectX Diagnostic Tool displays a wealth of information about DirectX, and also lets you perform basic diagnostic tests on the DirectX system. It is used to collect information about devices to help troubleshoot with DirectX sound and video related problems.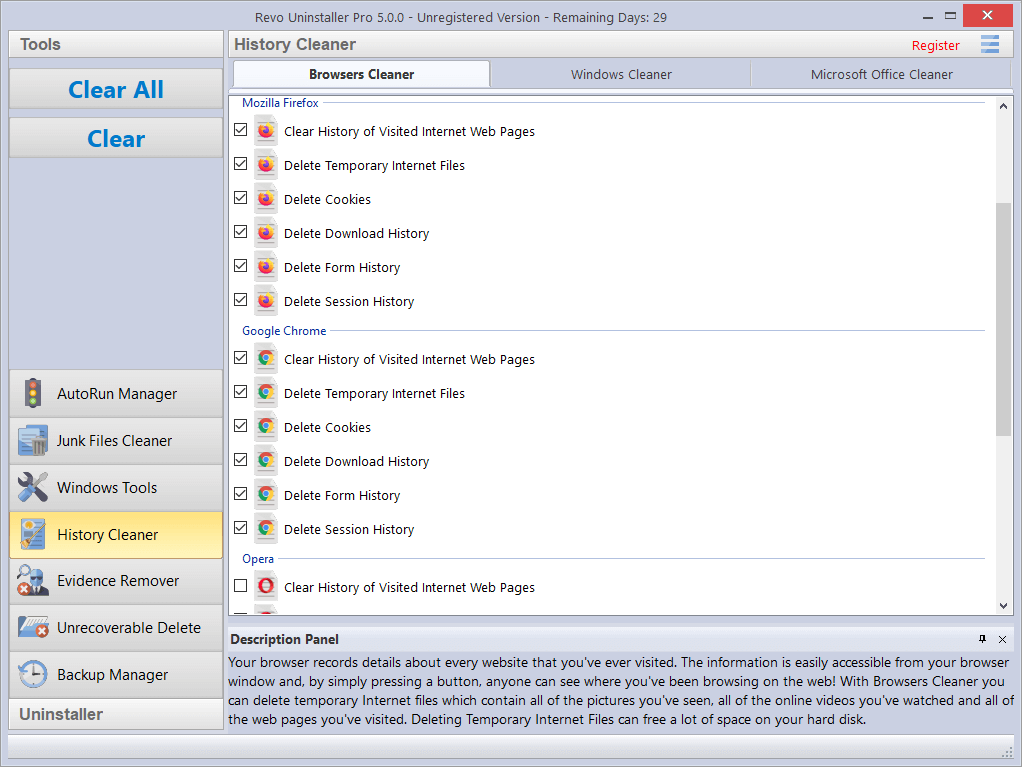
Browsers Cleaner – Your browser makes a detailed record of every web site you visit. A simple press of a button in your browser window lets anyone see what you have been browsing on the web. Temporary internet files include images, videos, audio files, etc., plus all the web pages you have visited. Browsers Cleaner erases web site history for the following browsers: Edge, Internet Explorer, Firefox, Google Chrome, and Opera. Deleting this history will also free up space on your hard disk.
Check the desired options for the browser history you want to clean and then click the Clear or Clear All buttons in the Commands Panel. You can also check or uncheck all options for one or all browsers by right clicking, and selecting the appropriate setting.
- Windows Cleaner – Microsoft Windows keeps a history of the many things you do – see the options listed below. Windows Cleaner lets you remove this history easily and quickly. You can also empty your Recycle Bin, and delete temporary files, freeing up more disk space. Available options for Windows Cleaner are:
- Clear Recent Documents History
- Clear Start Menu Run History
- Clear Find File History
- Clear Printers, Computers and People Find History
- Empty Clipboard
- Clear “MS Paint” Recent Files History
- Clear “MS WordPad” Recent Files History
- Clear “Regedit” Last Opened Key History
- Clear Common Dialog Open Save Recent Histry
- Clear Common Dialog Last Visited Folder History
- Empty Recycle Bin
- Delete Windows Temporary Files
- Delete Start Menu Click Logs
- Delete crash memory dump files
- Delete Chkdsk (Check Disk) recovered file fragments
- Delete Thumbnail Cache.
- Microsoft Office Cleaner – allows you to remove history of most recently used files in Microsoft Word, Excel, Access, and PowerPoint. If you do not want somebody else to see your last opened or edited documents, spreadsheets, or other files created using Microsoft Office, just select those, and click the Clear or Clear All button on the Commands Panel. Your most recently used files will no longer be listed. Windows also keeps a record of your recent files. Use Microsoft Windows Cleaner to clear them too. You can also quickly check or uncheck all options by right clicking, and selecting the appropriate option.
NOTE: Remember, the Clear All button will cleanse all 3 history modules in one go.
Deleting files and folders from the Recycle Bin does not mean that they are gone forever. They are simply marked as deleted but not physically erased. Your “deleted” data may be confidential, but can still be easily retrieved using standard recovery tools or undelete programs – even many years later.
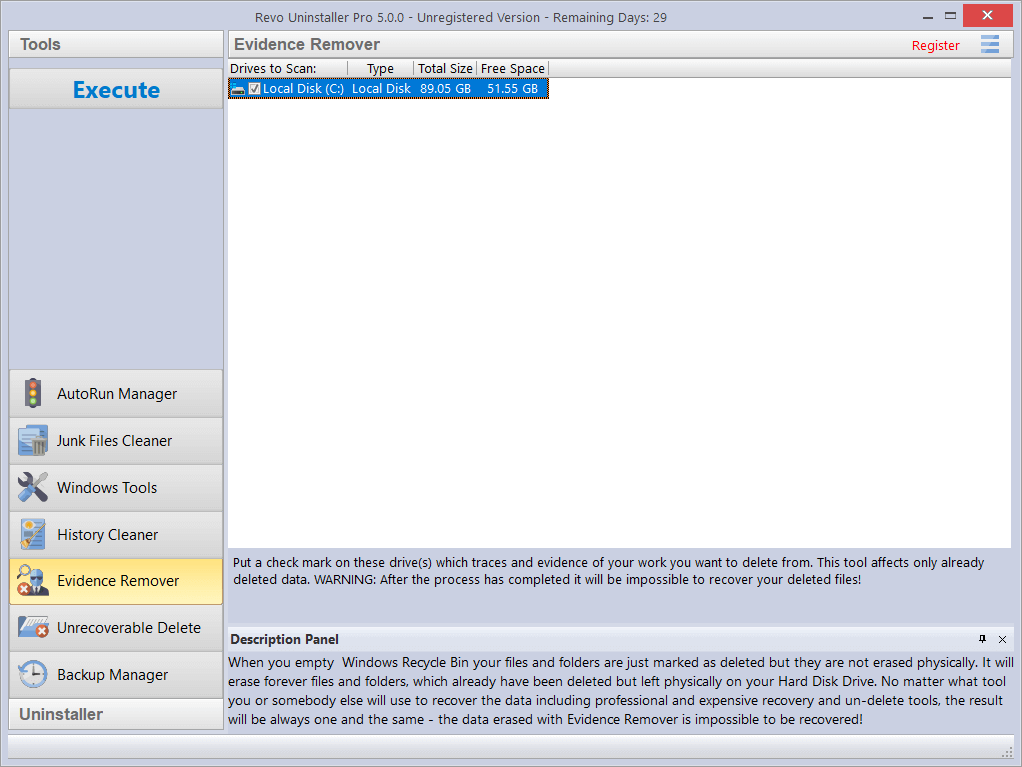
Evidence Remover will eliminate any possibility of data retrieval from your hard drive(s). It will permanently erase previously “deleted” files and folders still left physically on your hard disk. No matter what recovery tool (free, professional, expensive, whatever) may be subsequently employed, the result will always be the same – data erased with Evidence Remover is impossible to recover.
To erase previously deleted files and folders, simply check the drive from which those files were deleted, then click the Execute button in the Commands Panel. Once started, you will see a window with a progress bar and the estimated time remaining for the operation. You have the option to Pause/Resume the process.
The process can be slow, because the data is randomly overwritten three times. The overall speed depends upon:
- your computer’s processor (CPU);
- the size of the selected drive;
- any running programs;
- any running security software – antivirus, Internet Security, etc.
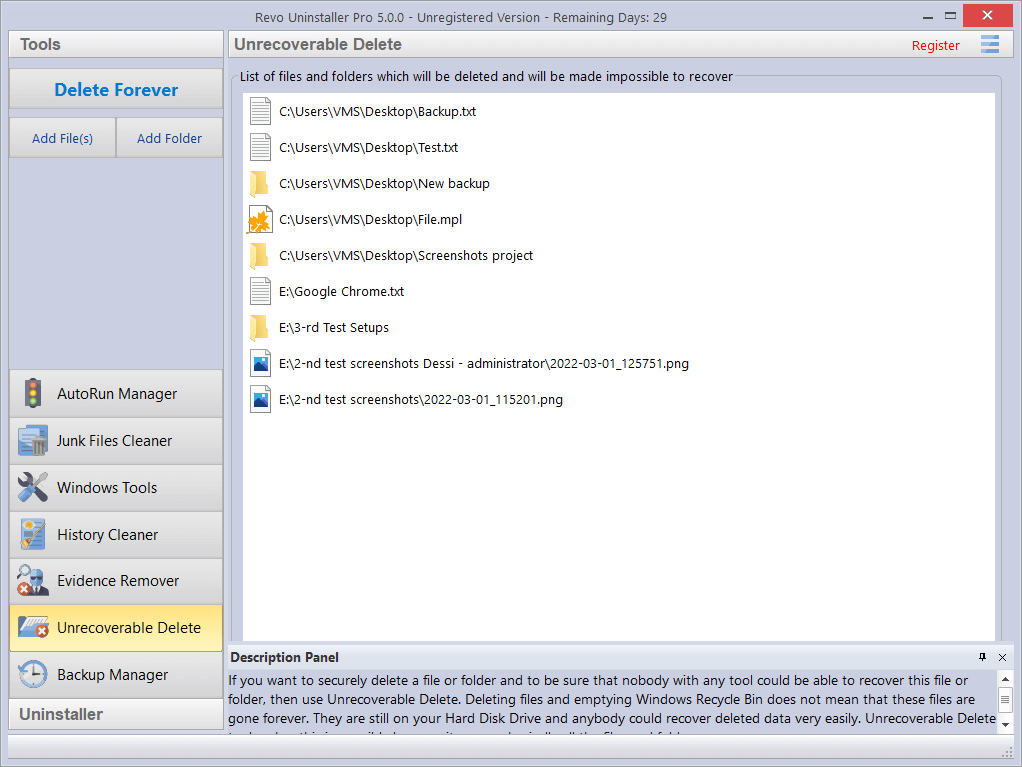 As detailed in Evidence Remover, simply deleting files and emptying the Recycle Bin does not mean they are gone forever. Deleting files in Windows just means that they are marked as such, and the space allocated to them up until that point then becomes available for other use. This is because if Windows had to physically erase all deleted files, it would take a long time and slow down your computer. There are also many system, temporary, and other files which are unimportant so making them unrecoverable would be waste of resources. Unrecoverable Delete physically only erases those files and folders that you select, but will take longer than a simple Windows delete. So to securely delete your selected files and folders and be sure that no one, with any recovery tool (free, professional, expensive, whatever) will retrieve them, use Unrecoverable Delete. The result will always be the same – the erased data is impossible to recover. Unrecoverable Delete has the following commands:
- Add File(s) – use it to add a file or files that you want to erase forever.
- Add Folder – use it to add a folder that you want to erase forever. All files and sub-folders of the selected folder will be erased.
- Delete Forever – starts the erasing process. Once you start the procedure, you will see a window with a progress bar and the estimated remaining time of the operation. You will also have the option to Pause/Resume the process.
IMPORTANT: You can cancel the process but the files erased before cancellation will be unrecoverable, so please be careful when selecting the files and folders you want to erase.
The window of the Unrecoverable Delete tool supports drag and drop of files and folders. Because Revo Uninstaller has administrative privileges, programs with lower privileges cannot drop files and folders in it. For example, if you run Windows explorer or any other file manager with a standard user account (not as administrator), you will not be able to drag and drop files in Unrecoverable Delete tool.