- 3.1 All Programs
- 3.2 Traced Programs
- 3.3 Windows Apps
- 3.4 Browser Extensions
- 3.5 Logs Database
- 3.6 Forced Uninstall
- 3.7 Install Programs
- 3.8 Hunter Mode
- 3.9 Uninstall History
- 3.10 Forced MSI Uninstall
When Revo Uninstaller Pro is started, its main window displays installed programs on your computer. Depending on the settings, other items, such as system updates or system components may also be listed. Depending on the view setting, programs are shown as Icons, a List, or in a table with Details such as Name, Size, Version, Type, Installation Date, Company, Comment, Uninstall String, Registry Key (hidden by default) and Website.
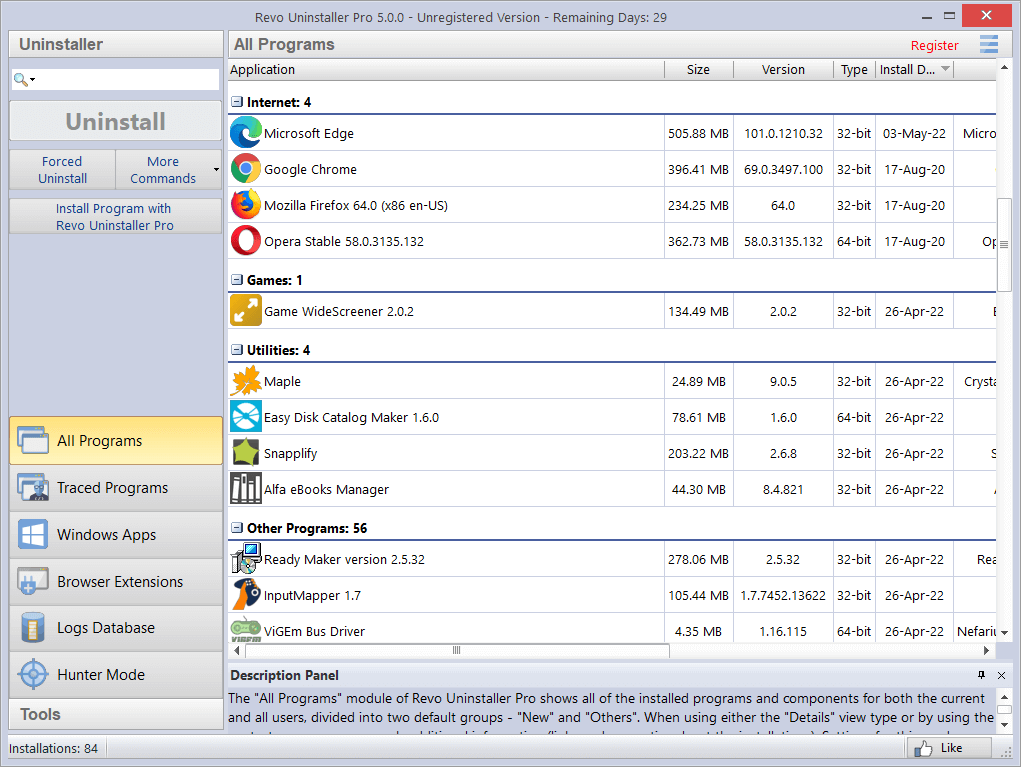
By default, installed programs are displayed in Details view. You can right click on the column header to sort, and you can show or hide some of the columns. This way you can also choose what to print. Printing works only in Details view, which is why it is better to setup printing in landscape mode, as that would contain much more information. Using the commands in the context menu, you can also change the alignment of the text in each column.
![]()
![]()
In Icons view, when you select a program, some of the properties of the program (like Icon, Size, Version, Install Data, Company, Update Link and Web Site, are shown in the Description Panel. You may also see similar data when you hover the mouse cursor over a program in the list. In that case, the data is shown as a tooltip, next to the mouse cursor.
By default, Revo Uninstaller Pro displays programs in two groups:
- New programs – programs installed in the last 7 days (the number of the days can be changed in the options) or since the last run of Revo Uninstaller Pro;
- Other Programs – all programs installed before the last 7 days, or before the last run of Revo Uninstaller Pro.
You can assign each program to a group by using the context menu when right clicking on a program. Removing a program from a group is also possible from the same context menu. The default groups are Internet, Games, Multimedia and Utilities. Additional groups can be added from the Groups Manager in the Options, or directly from the context menu: Add to Group -> Add new group.
The selected (right clicked) item will be automatically moved to the newly added group.
Using the Search field in the upper right part of the Commands Panel, you can filter the program list by name, publisher, or comment. You can choose the search criteria from the drop-down menu shown after clicking the magnifying glass. The program list will be filtered in real-time as you type. When searching, the status bar will display the number of found programs that match the search criteria.
Revo Uninstaller Pro has a command to export installed programs to TXT, HTML and XLS (Microsoft Excel spreadsheet). To use the command, click More commands -> Export List to. You can choose what information will be included in the exported file.
NOTE: To export installed programs to a Microsoft Excel spreadsheet you must have Microsoft Excel installed and working properly.
Some other commands available from the context menu are:
- Search at Google for – use it to search online using Google for the application’s name or publisher. This will open your default web browser and display the results of the search.
- Open About Link – opens your default web browser and loads the address providing more information about the program, if such exists.
- Open Help Link – opens your default web browser and loads the address providing help information for the program, if such exists.
- Open Update Link – opens your default web browser and loads the address providing update information for the program, if such exists.
- Install Location – opens the location where the program is currently installed in Windows Explorer.
- Open Registry Key – opens the Registry editor (regedit.exe) and displays the Registry key containing the uninstallation information for the selected application.
- Add/Edit Comment – opens a window to add a comment about the program, or edit an existing one. The comment is visible in Details view.
- Change Icon – pens a window to select a new icon for the program displayed in the list. You can browse for an icon in any EXE or DLL file.
If during an uninstallation the built-in uninstaller of a program runs a “Change” or “Repair” command, and tries to reinstall or repair the program instead of uninstalling it, then you can use the Forced MSI Uninstall command. This command is visible in the context menu only for MSI (Microsoft Installer) programs, whose default uninstallation command is not “uninstall”. So if you experience such problem, just cancel both the built-in uninstaller of the program and Revo Uninstaller Pro’s uninstall wizard, and start the uninstallation again using the aforementioned command from the context menu.
In some cases, when a program is selected, depending on the installer of that program, you may see in the More commands menu the command Change or Repair. That command is shown only when the installer of the program supports such functionality. Executing it will open a window letting you change the installed components of the program, or repair its installation in case it does not work properly.
If there are some kind of general problems with the listing of all installed programs, and the Refresh command (located in the More commands menu) does not fix it, you may try to rebuild the cache file that contains the installed programs data. To execute the Rebuild cache file command, you have to open the Options from the Menu button (or press Alt+O on your keyboard), go to the All Programs page, and click the “Rebuild cache file” blue text.
NOTE: Rebuilding the cache file resets any user customization for the program list, so your comments, custom icons, and group associations will be erased. You will see a warning message before rebuilding the cache.
The most popular method employed by our Users. Select a program to remove, and left click on the Uninstall button. An uninstall wizard will open and indicate progress.
NOTE: Revo Uninstaller Pro will silently search the Logs Database for matching trace log(s) to the program you are removing, or for logs you have personally traced or imported.
- If a single log is found, and Revo Uninstaller Pro decides to use it, you will be informed at stage 2 of the Uninstall Wizard.
- If several are found, you will be asked if you wish to use them.
TIP: The built-in uninstaller may show up behind other open windows. If so – hold the Alt key and press the Tab key to cycle between windows.
TIP: Continue Uninstall after system restart – If the Uninstall Wizard is open and the computer automatically reboots, either at the request of the program’s built-in uninstaller, or for some other reason – don’t worry. Revo Uninstaller Pro will store the uninstall data, and offer to continue the unfinished uninstall the next time the computer is restarted. You will see a message offering to either continue, postpone, or simply cancel the procedure.
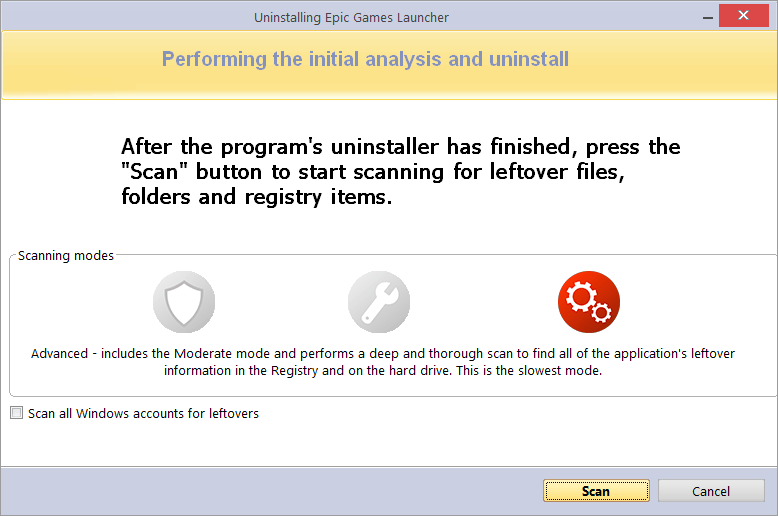
After the built-in uninstaller has finished, click the Scan button to continue the removal process. You are reminded to set the scan to Moderate at this stage of your learning.
- Safe – performs a scan of the Registry and the hard drive to find leftover data to delete. This is the fastest mode.
- Moderate – includes the Safe mode, and performs an extended scan to find all leftover data in the most common places in the Registry and on the hard drive.
- Advanced – includes the Moderate mode, and performs a deep, thorough scan to find all leftover data in the Registry and on the hard drive. This is the slowest mode.
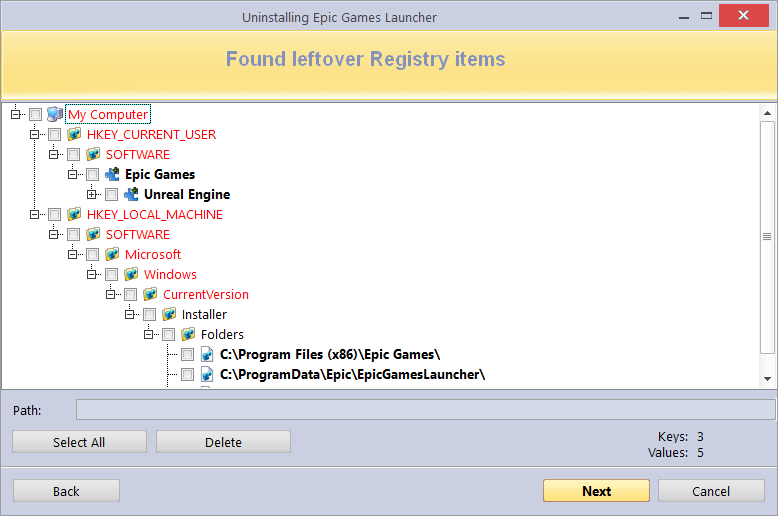
After the scan is complete, Registry items will be shown in a new window. Registry keys and values created by the uninstalled program are highlighted in Bold. Items in red will never be deleted.
- To give you a better idea of the tree structure.
- To make for easy and fast selection of leftover items for deletion.
Many leftover items are easily distinguished by name, by install path, etc. GUIDs and CLSIDs (alphanumeric items) are correct leftover items most (99%) of the time, and so you can safely delete them.
Right click any item to open a context menu to help manage your decision making. Most options are self explanatory, but note the following:
- Expand All/Collapse All – expands and collapses all items in the Registry tree.
- Open Registry Key… – opens the key in the Windows Registry (regedit.exe).
- Uninstall Selected Key – deletes the key from the Windows RegistryIMPORTANT: Only for use by Advanced Users when conducting a Custom or Advanced Uninstall.
- Add to Exclude List – adds the selected key to protect from deletion, and marks it in red. You can edit the exclude list from the Options menu.
- Mark selected key as Created – is useful when you positively identify a Registry key, as created by the program being removed, but not marked as created because of the safety algorithms within Revo Uninstaller Pro.IMPORTANT: Only mark the key if you are absolutely certain that it belongs to the uninstalled program!
If, at this stage, you prefer to change the scanning mode, click the Back button, and return to the previous step, select a new scanning mode, and press Scan again to continue.
If for example:
- You installed 2 versions of the same program. Say “Adobe Photoshop CS” & “Adobe Photoshop CS5”. In this example, you can possibly distinguish leftover items by their description.
- You wish to remove a single component of a larger software package such as Excel, part of Microsoft Office. In this example, Revo Uninstaller Pro could list the rest of the components (Word, PowerPoint etc) as leftover items as they are in the same program folder, and thus could not distinguish the difference.
After removing the leftover Registry items, click the Next button, and continue to the leftover files and folders window. The Next button is unavailable if none are found.
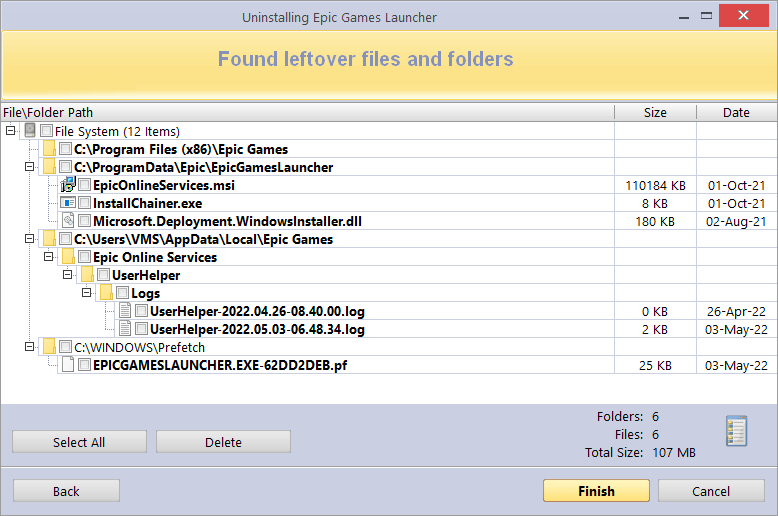
Leftover files and folders are identified by name, and can be deleted as necessary.
Click the Select All button to check all leftover files and folders, then click the Delete button to remove them to the Recycle Bin. You can change this setting in Options -> All Programs.
You can switch the view of leftovers from a tree to a list using the icon on the right of the properties of found leftovers. After removing the leftover files and folders, click the Next button, and continue to the Summary window to review the results of the uninstall operation.
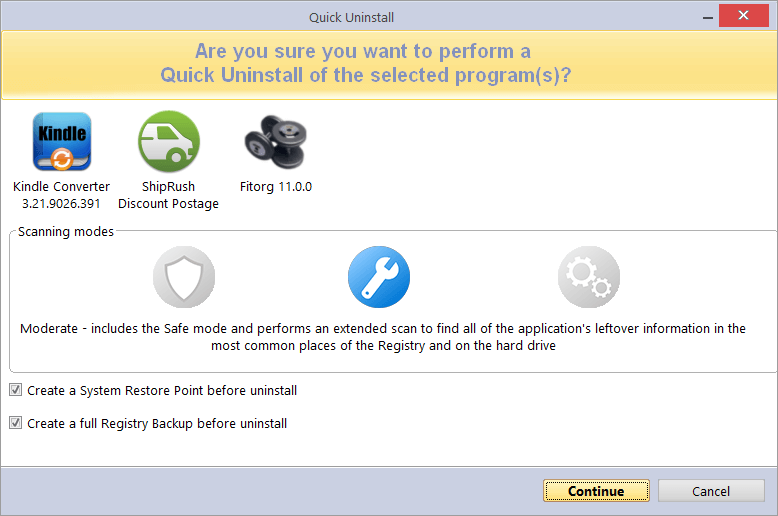
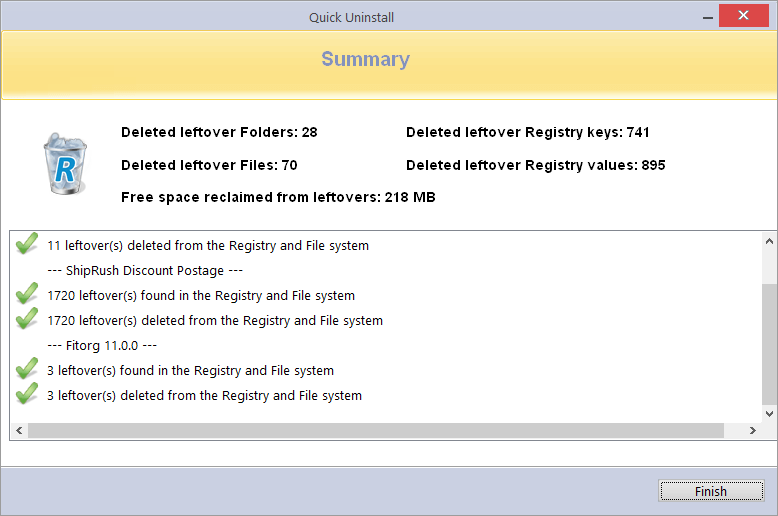
Another simple way to uninstall a program. Simply choose the one you wish to remove, select the More Commands button, and left click on Quick Uninstall. If applicable, the builtin uninstaller of the program will run silently in the background. You will be prompted to confirm you wish to delete the chosen program, and to Continue the uninstall before receiving a notification to say “Finished”.
We recommend you leave the scan mode set to Moderate, although you have the option to choose Safe or Advanced.
You can also remove multiple programs consecutively with just one set of actions. Simply hold the “Ctrl” button and select the programs you wish to remove or select them using the check boxes in front of the listed programs. The Uninstall button will automatically switch to the Quick Uninstall button. Left click and Revo Uninstaller Pro will operate as before with just one slight difference. The built-in uninstaller of the first program/app will be launched (silently, if possible, in order to automate the process), followed by an automatic scan and removal of leftovers. If the builtin uninstaller fails to launch or takes too long to do so, you will be allowed to click the “Continue” button to proceed directly to the leftover scan. After the first program/app is uninstalled, Revo Uninstaller Pro will proceed with the removal of the second program or app in the queue, etc.
Therefore, the System Restore Point and full Registry Backup will be performed only once – at the very beginning. At the end of the uninstall operation, a summary will be presented to you.
The Traced Programs module of the Uninstaller shows all installation logs traced with Revo Uninstaller Pro. To start the module, click its button in the Uninstaller group of modules in the lower part of the Commands Panel.
To trace a program with Revo Uninstaller Pro you can right click on its installation (setup) file, and select Install with Revo Uninstaller Pro, or click the Install Program with Revo Uninstaller Pro button on the Commands Panel while All Programs or Traced Programs modules are opened. More details are available in section 3.2.4 of the user’s guide.
Depending on the view setting, logs are shown as Icons, a List, and with Details such as Name, Size, Creation Date, Registry items, Files and Folders, Comment, and Import status.
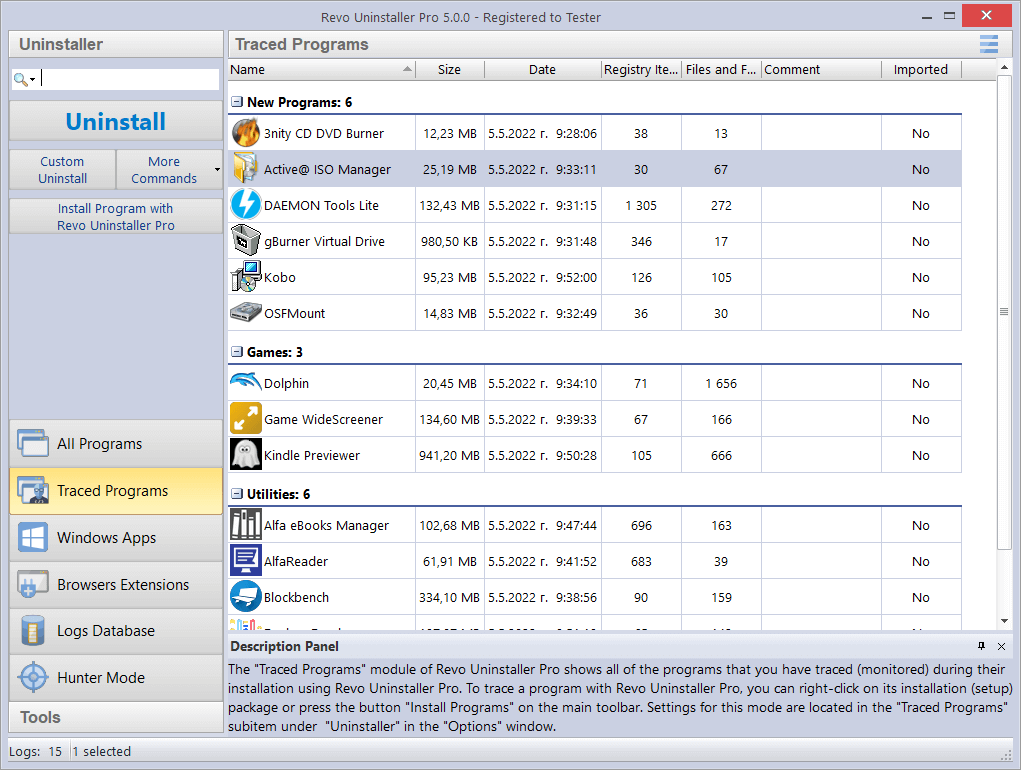
By default, created logs are shown in the Icons view mode, and when you select a log, below in the Description Panel you will see some of the properties of the selected log: Icon, Size, Date, Registry items, and Files and Folders. You may see similar information when you hover the mouse cursor over a log in the list. In that case, the information is shown as a tooltip, next to the mouse cursor.
Using the Search field in the upper right part of the Commands Panel, you can filter the program list by name, publisher, or comment. You can choose the search criteria from the drop-down menu shown after clicking the magnifying glass. The program list will be filtered in real-time as you type. When searching, the status bar will display the number of found programs that match the search criteria.
All logs are grouped in two default groups – New Programs and Other Programs. The total number of logs is shown in the status bar.
You can assign each program to a group by using the context menu when right clicking on a program. Removing a program from a group is also possible from the same context menu. The default groups are Internet, Games, Multimedia and Utilities. Additional groups can be added from the Groups Manager in the Options, or directly from the context menu: Add to Group -> Add new group.
The selected (right clicked) item will be automatically moved to the newly added group.
Some other commands available from the context menu are:
- Export Log – exports the data of the log to a file for easy and convenient importing on another computer.
- Delete Log – deletes the log from the list, including all data in the log, the installed program remains untouched.
- Merge selected logs – combines the data of two or more selected logs into a single log.
- Add/Edit Comment – opens a window to add a comment about the program, or edit an existing one. The comment is visible in Details view.
- Change Icon – opens a window to select a new icon for the program displayed in the list. You can browse for an icon in any EXE or DLL file.
- Rename Log – lets you change the name of the log in the list.
- Edit Log – opens a window allowing you to change all data in the log. For more information, check section 3.2.4.
- Remove from Group – Removes the selected log(s) from its current group.
Traced Programs settings are located in Options -> Traced Programs.
Available commands to work with the logs are…
This is the easiest way to uninstall a program. Click the Uninstall button of a logged program and Revo Uninstaller Pro will do the rest.

The uninstall wizard will display progress and close automatically once the uninstall completes. By default, all deleted Registry items are backed up.
A Custom Uninstall of a logged program allows you to select which changes made to the system during the installation of said program you want to revert. After executing the command, the uninstallation wizard will start. The wizard may consist of one or two steps, depending on the items the log contains. A tree structure displays all logged (if any) Registry items in the first step of the uninstallation wizard. The wizard has two windows – the left one displays the Registry keys tree, and the right one displays the Registry values in the corresponding key. There are two counters in the lower part of the window; they show the numbers of logged keys and values.
The different colors and fonts provide more information about the items:
- Bold item – logged by Revo Uninstaller Pro as created by the installed program
- Red item – the item is excluded from the uninstallation process (the list of excluded items is shown in Options -> Uninstaller -> Traced Programs -> the Registry tab)
- Grayed item – the item does not exist in the system at the moment

You have to check items that you want to uninstall. If you want to uninstall all of them, you can use the Select All button to check them all. However, regardless what items have check marks, only items that are both checked and in bold will be deleted.
To start the uninstallations, press the Uninstall button, and you will see the progress bar for the operation.
There are some commands available from the context menu of the tree:
- Expand All – expands the entire tree so the whole hierarchy of keys is visible.
- Collapse All – collapses the entire tree making “My Computer” the only visible item.
- Export All – exports displayed leftover data to an HTML file.
- Expand selected key – expands only the selected key making all its sub items visible.
- Collapse selected key – collapses only the selected key making its sub items hidden.
- Uninstall selected key – deletes the selected key even if the item does not have a check mark.
- Mark selected key as Created – marks the selected key as if it was created by the program, so it will be removed during the uninstallation process. This feature is useful when you see a Registry key, which you are sure is created by the program but is not marked as created because of the safety algorithms in Revo Uninstaller Pro.
Warning: Be very careful using this command. Mark the key only if you are absolutely certain that it belongs to the uninstalled program!
- Add to Exclude List – adds the selected key to the exclude list, which protects the key from deletion, and marks it in red. You can edit the exclude list from the Options in Revo Uninstaller Pro.
- Open Registry Key – opens the selected Registry key in the Windows Registry Editor (regedit.exe).
There are two commands available from the context menu of the list of values:
- Uninstall selected values – deletes the selected value. To select multiple random values, you can hold down the Ctrl key on your keyboard while selecting them with your mouse. For multiple consecutive values hold down the Shift key.
- opens the parent Registry key of the selected value in the Windows Registry Editor (regedit.exe).
If there are any logged files and folders, you can click the Next button to see the list. There are two counters in the lower part of the window; they show the numbers of logged files and folders. There is also an option to rename items that had existed with a certain name before the installation of the program, but were renamed during said installation: Execute Rename operations of previously existing on the system files and folders.
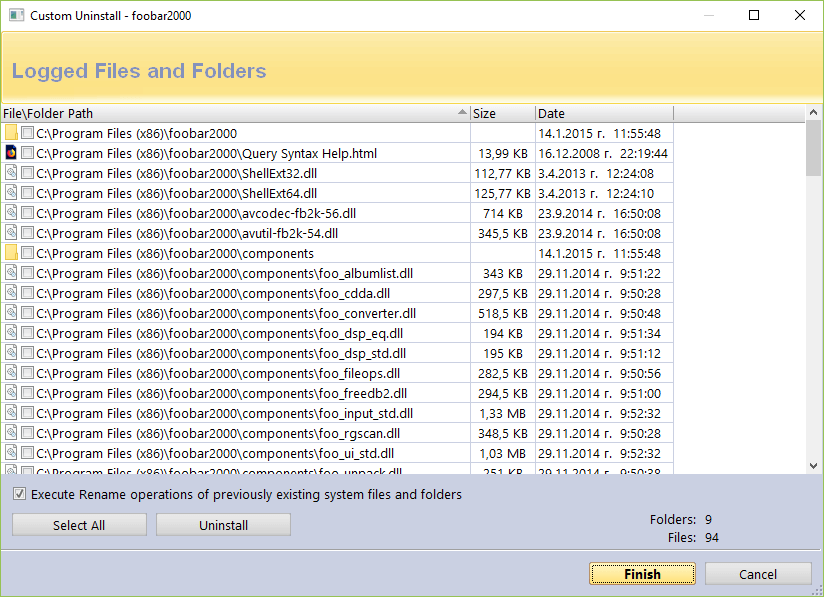
If you want to uninstall files and folders, you have to check them, or use the Select All button to check all existing items, and remove them by clicking the Uninstall button.
There are two commands available from the context menu of the list of files and folders:
- Open – acts the same way as if you double clicked on the file or folder in Windows Explorer. Note that if there is no program associated with the file, nothing will happen.
- Properties – acts the same way as if you right clicked on a file, and chose Properties – shows various properties like file size, attributes, date of creation, modification, etc.
- Open Containing Folder – opens the folder that contains the selected item in Windows Explorer.
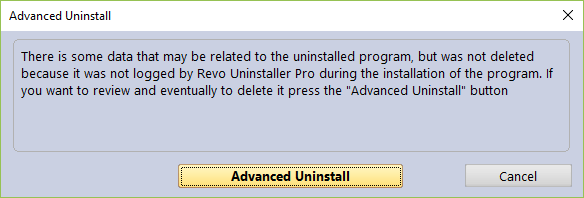
While the uninstallation of a traced program is in progress, Revo Uninstaller Pro may detect that there is some data related to the uninstalled program, which was not deleted because it was not logged by Revo Uninstaller Pro during the installation of the program. In that case, you will see a window with an Advanced Uninstall button. The Advanced Uninstall feature lets you review and delete the aforementioned data. If you want to review and possibly delete it, press the Advanced Uninstall button. This will start the Advanced Uninstall wizard, which may consist of two steps, one for the Registry leftovers, and one for the file and folder leftovers.
Warning: before deleting data using the Advanced Uninstall feature, be certain that it is related to or created by the uninstalled program.
If there are possibly related to the uninstalled program Registry items you will see the first step of the wizard – tree with Registry items you can uninstall. When you click on a key in the tree its values, if any, are shown in the list. The font property of items is used to give more information about the items. Such information is:
- Bold item – logged by Revo Uninstaller Pro as created by the installed program.
- Red item – the item is excluded from the uninstallation process (the list of excluded items is shown in Options -> Uninstaller -> Traced Programs -> the Registry tab).
You have to check items that you want to uninstall. If you want to uninstall all of them, you can use the Select All button to check them all. However, regardless what items have check marks, only items that are both checked and in bold will be deleted.
To start the uninstallations, press the Uninstall button, and you will see the progress bar for the operation.
There are some commands available from the context menu of the tree:
- Expand All – expands the entire tree so the whole hierarchy of keys is visible.
- Collapse All – collapses the entire tree making “My Computer” the only visible item.
- Expand selected key – expands only the selected key making all its sub items visible.
- Collapse selected key – collapses only the selected key making its sub items hidden.
- Uninstall selected key – deletes the selected key even if the item does not have a check mark.
- Mark selected key as Created – marks the selected key as if it was created by the program, so it will be removed during the uninstallation process. This feature is useful when you see a Registry key, which you are sure is created by the program but is not marked as created because of the safety algorithms in Revo Uninstaller Pro.
Warning: Be very careful using this command. Mark the key only if you are absolutely certain that it belongs to the uninstalled program!
- Add to Exclude List – adds the selected key to the exclude list, which protects the key from deletion, and marks it in red. You can edit the exclude list from the Options in Revo Uninstaller Pro.
- Open Registry Key – opens the selected Registry key in the Windows Registry Editor (regedit.exe).
There are two commands available in the context menu of the list of values:
- deletes the selected value. To select multiple random values, you can hold down the Ctrl key on your keyboard while selecting them with your mouse. For multiple consecutive values hold down the Shift key.
- Open Parent Registry key – opens the parent Registry key of the selected value in the Windows Registry Editor (regedit.exe).
If the Advanced Uninstall feature has detected additional leftover files and folders, click Next to see the list. There are two counters in the lower part of the window; they show the numbers of logged files and folders. If you want to uninstall files and folders, you have to check them, or use the Select All button to check all existing items, and remove them by clicking the Uninstall button.
There are two commands available from the context menu of the list of files and folders:
- Open – acts the same way as if you double clicked on the file or folder in Windows Explorer. Note that if there is no program associated with the file, nothing will happen.
- Properties – acts the same way as if you right clicked on a file, and chose Properties – shows various properties like file size, attributes, date of creation, modification, etc.
- Open Containing Folder – opens the folder that contains the selected item in Windows Explorer.
The Manage menu (available when clicking the More Commands button) has the following commands…
- Delete Log / Delete selected Logs – deletes the selected trace log(s) from the Revo Uninstaller Pro’s list and from the hard drive. This does not affect the installed program(s).
- Merge selected logs – combines the logged data of the selected logs into a single log. The chronologically older(est) log is used as the main one, i.e. the data from the more recently created log(s) will be inserted into the older(est) log. After the merging process, you will be prompted to enter a name for the merged log. By default the name of the older(est) log is used but you can change it if you wish. The more recent log(s), whose data is merged, is/are deleted.
- Rename Log – lets you change the name of the log in the list.
- Edit Log – opens a window allowing you to change all data in the log. More information can be found a bit further down in the manual.
- Import Log – opens a Windows Explorer dialog window allowing you to select .ruel files, which are exported trace logs by Revo Uninstaller Pro. After importing a log, it will appear in the Traced Programs module, alongside any other trace logs you may have created, and you can use the newly imported trace log as if you yourself have created it.
An alternative way to import an exported log file is to double click on it in your file manager, as Revo Uninstaller Pro should be associated with .ruel files. Revo Uninstaller Pro must be closed for the importing to work. - Export Log – allows you to export the created trace log into a .ruel so it can be imported later. For example, if you have problems uninstalling Program A, or just want to do a better uninstall of it, and a friend of yours has installed and traced the same program so he has a trace log. He can export the log, and send the .ruel file to you so you can import it, and use as if you had traced the program yourself.
The Edit Log window looks like this:
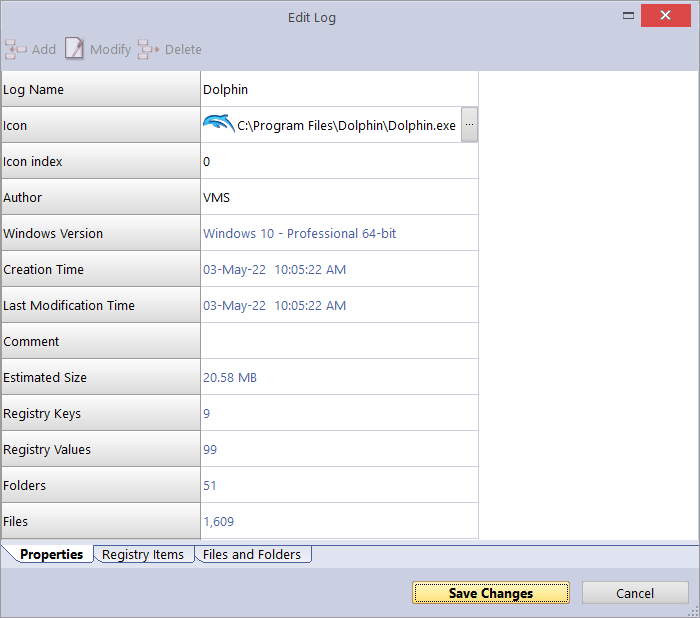
It contains three sections (tabs):
- Properties – contains general information about the trace log: name, icon, the creator of the trace log, the version of Windows under which it was created, dates of creation and modification, number of logged Registry entries, files, and folders. From this tab, you can review and edit some common information of the log, user comment, etc. You can change the Name, Icon, Author, and Comment properties. Other listed fields are read-only, but their data will change if you make changes to the trace log.
- Registry Items – here you can view and modify the logged Registry keys and values, contained within the trace log. A tree structure shows all logged (if any) Registry entries in a window divided into two parts – the left one shows all Registry keys in a tree-like structure, whereas the right one shows the corresponding value in a selected. The context menu commands and the meaning of the colored/bolded items in the tree and list is the same as described in the Custom Uninstall section (3.2.1). Modifications can be made using the commands using the toolbar at the top of the window. These are the commands:
- Add Value/Key – allows you to manually add Registry keys and values to the trace log. To add a key or a value to the log, first you have to select a key from the tree that will be the parent of the newly added item.
- Modify – allows you to modify the data of an existing Registry key or value. First select the entry, click Modify, and make the desired changes.
- Delete – deletes the logged Registry key or value from the trace log file. This does not affect any data in the Registry of your operating system.
- Export list to HTML – exports the data from the opened tab to an HTML file.
- Files and Folders – here you can view and modify files and folders logged in the trace file. They are displayed in a simple list. The context menu commands and the meaning of the colored/bolded items in the tree and list is the same as described in the Custom Uninstall section (3.2.1). Modifications can be made using the commands using the toolbar at the top of the window. These are the commands:
- Add File/Folder – allows you to manually add files and folders to the trace log. To add a file or folder, first you have to select a folder from the tree that will be the parent of the newly added item.
- Modify – allows you to modify a few properties of a logged file or folder, namely whether they were created or renamed, and the name of said file or folder.
- Delete – deletes the logged file or folder from the trace log file. This does not affect any data on your hard or SSD drive.
- Export list to HTML – exports the data from the opened tab to an HTML file.
The Windows Apps module lists all installed Windows apps, this includes built-in apps when you install Windows, and apps downloaded from Microsoft Store. The module helps you uninstall any app with a single click. To start the Windows Apps module click press its button in the lower part of the Commands Panel
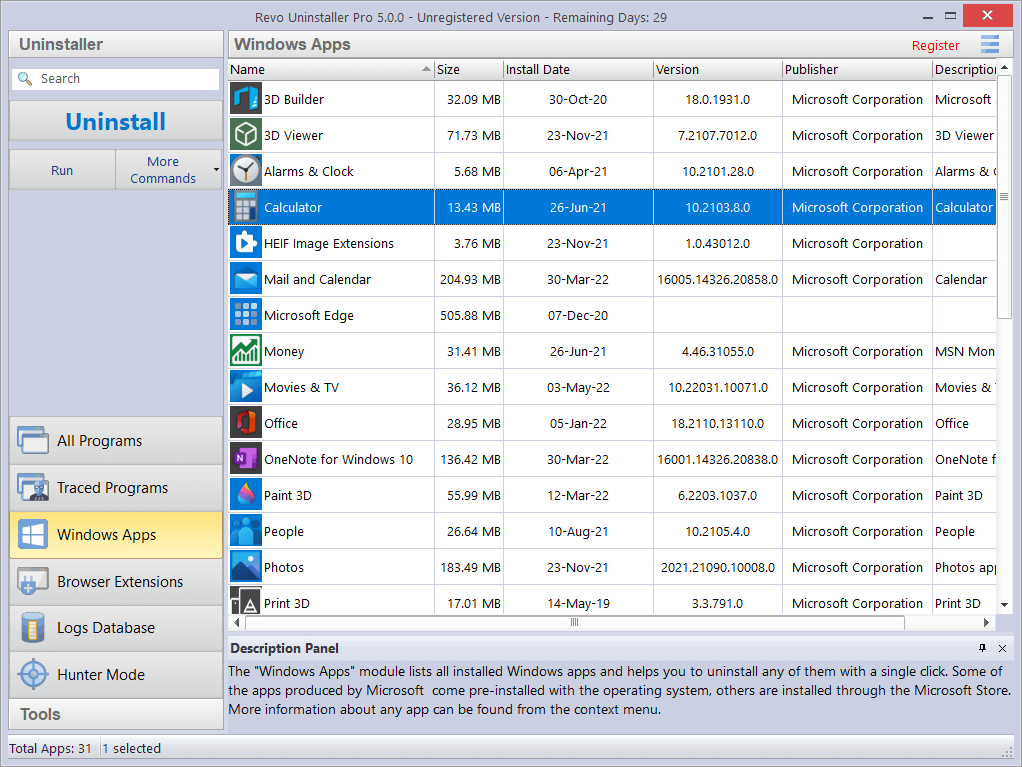
The main window has a few columns with Name, Size, Install Date, Version, Publisher, and Description. Right clicking the header of a column allows you to change the alignment and choose which columns are shown. The entire list may be sorted by clicking a column header.
Click on the list or the Search field in the Commands Panel, to filter Apps in real time by name. Select the App to remove and left click the Uninstall button. An uninstall wizard will open and indicate progress. If you are not sure what the listed App is, you can use use the Run button from its context menu to launch it.
Right clicking an App will give you the option to uninstall it from all user accounts, to forcibly stop it (using the Terminate command) or to Reset the App to its initial state with default settings.
Revo Uninstaller Pro will create a full Registry backup (unless disabled in Options) a System Restore Point (unless disabled in Options), and then uninstall the App. If the App or part of it is successfully uninstalled, an entry will be added to the Uninstall History section in Windows Apps module.
If you are experiencing issues with Microsoft Store in general, it can also be reset using the Reset Microsoft Store command from the More Commands button.
Using the Search field in the upper right part of the Commands Panel, you can filter the app list by name, publisher, or comment. The app list will be filtered in real-time as you type. When searching, the status bar will display the number of found programs that match the search criteria. The main command is Uninstall – selecting an app and pressing the Uninstall button will bring up the Uninstall Wizard. Revo Uninstaller Pro tries to create a full Registry backup (if this is not disabled in the Options) and a System Restore Point, and then runs the default command to uninstall the app. After the app is uninstalled, you have to click the Scan button to continue the uninstallation process with Revo Uninstaller Pro.Revo Uninstaller Pro shows found leftover Registry entries first. Registry keys and values found as created by the uninstalled program are in bold. Entries that are NOT in bold are considered as not created by the uninstalled program. You can safely check them (leave them checked), as they will not be deleted! Entries not in bold are displayed for two reasons: 1) for information: to give you a better idea of the tree structure, and 2) to make selecting leftovers for deletion easier and faster. You can simply check an entire parent branch, as that will automatically select all of its children. This eliminates the need to check each individual leftover item manually and separately. So, again, whatever items you check, when you press the Delete button, only entries that are checked and in bold will actually be deleted. This applies to when the Select All button is used as well.Deleted Registry entries are backed up, so if you need them later you can restore them using the Backup Manager.You can bring up a context menu by right clicking. These are the available commands:
- Expand All – expands all items in the Registry tree – by default it is expanded so you should not see any difference the first time you use this command.
- Collapse All – collapses all items in the Registry tree.
- Export All – export shown leftover data to an HTML file.
- Expand selected key – expands the selected key and its sub items.
- Collapse selected key – collapses the selected key and its sub items.
- Uninstall selected key – deletes the selected key from the system.
- Mark selected key as Created – marks the selected key as created by the program you are uninstalling. This feature is useful when you see a Registry key, which you are sure is created by the program but is not marked as created because of the safety algorithms in Revo Uninstaller Pro.
Warning: Be very careful using this command. Mark the key only if you are absolutely certain that it belongs to the uninstalled program!
- Add to Exclude List – adds the selected key to the exclude list, which protects the key from deletion, and marks it in red. You can edit the exclude list from the Options in Revo Uninstaller Pro.
- Open Registry Key – opens the selected Registry key in the Windows Registry Editor (regedit.exe).
After removing the Registry leftovers, you can click the Next button, and continue to the file and folder leftovers. Note that the Next button may not be available if there are no other leftovers found.
Revo Uninstaller Pro shows you found leftover files and folders so you can check the results, and delete the ones you want. Revo Uninstaller Pro also displays the number of files and folders found, as well as their total size on the drive.
In case you want to change the scanning mode, or you have not deleted all Registry items you can click the Back button, and return to the previous step.
Deleted files and folders are moved to the Recycle Bin by default, so you can recover them from there. You can change that option in Options -> All Programs.
You can bring up a context menu by right clicking on a file or folder:
- Open – acts the same way as if you double clicked on the file or folder in Windows Explorer. Note that if there is no program associated with the file, nothing will happen.
- Properties – acts the same way as if you right clicked on a file, and chose Properties – shows various properties like file size, attributes, date of creation, modification, etc.
- Open Containing Folder – opens the folder that contains the selected item in Windows Explorer.
- Export – exports the list of found leftover files and folders to an HTML file.
You can use the Select All button to select all found leftover files and folders at once and then use Delete button to delete them.
Other commands available in the context menu for Windows Apps are:
- Search at Google for – use it to search online using Google for the application’s name or publisher. This will open your default web browser and display the results of the search.
- Install Location – opens the location where the app is currently installed in Windows Explorer.
- Open Registry Key – opens the Registry editor (regedit.exe) and displays the Registry key containing the uninstallation information for the selected application.
- Refresh – reloads the Windows Apps list.
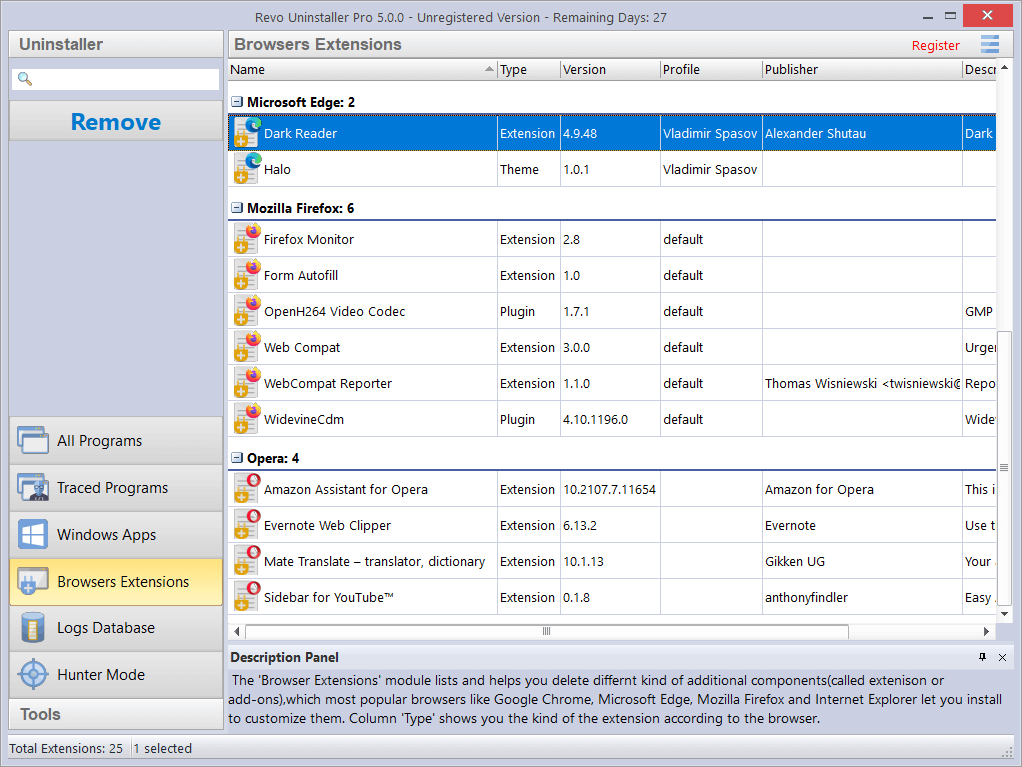
The Browser Extensions module lists and helps you delete different kinds of additional components (called extensions or add-ons), which popular browsers let you install for additional customization. Browser extensions are shown in groups, based on the browser. Currently, supported are: Google Chrome, Mozilla Firefox, Microsoft Internet Explorer, and Microsoft Edge. To start it click its in the lower part of the Commands Panel.
The main window has columns containing the Name, Type, Version, Publisher, and Description. The Type column shows you what kind of an extension is, according to the browser. Right clicking the header of a column allows you to change the alignment and choose which columns are shown. The entire list may be sorted by clicking a column header.
Using the Search field in the upper right part of the Commands Panel, you can filter the browser extension list by name, publisher, or description. The browser extension list will be filtered in real-time as you type. When searching, the status bar will display the number of found programs that match the search criteria.
For Microsoft Edge extension the main command is Uninstall, whereas for the other browsers it is Remove. Selecting a Microsoft Edge extension and pressing the Uninstall button starts a Windows App uninstallation process because all Edge extensions are installed as apps. For details of the process, see section 3.3. Selecting an extension of another browser and pressing the Remove button starts the extension removal process.
Other commands available in the context menu for Browser Extensions are:
- Search at Google for – use it to search online using Google for the extension’s name or author. This will open your default web browser and display the results of the search.
- Refresh – reloads the Browser Extensions list.
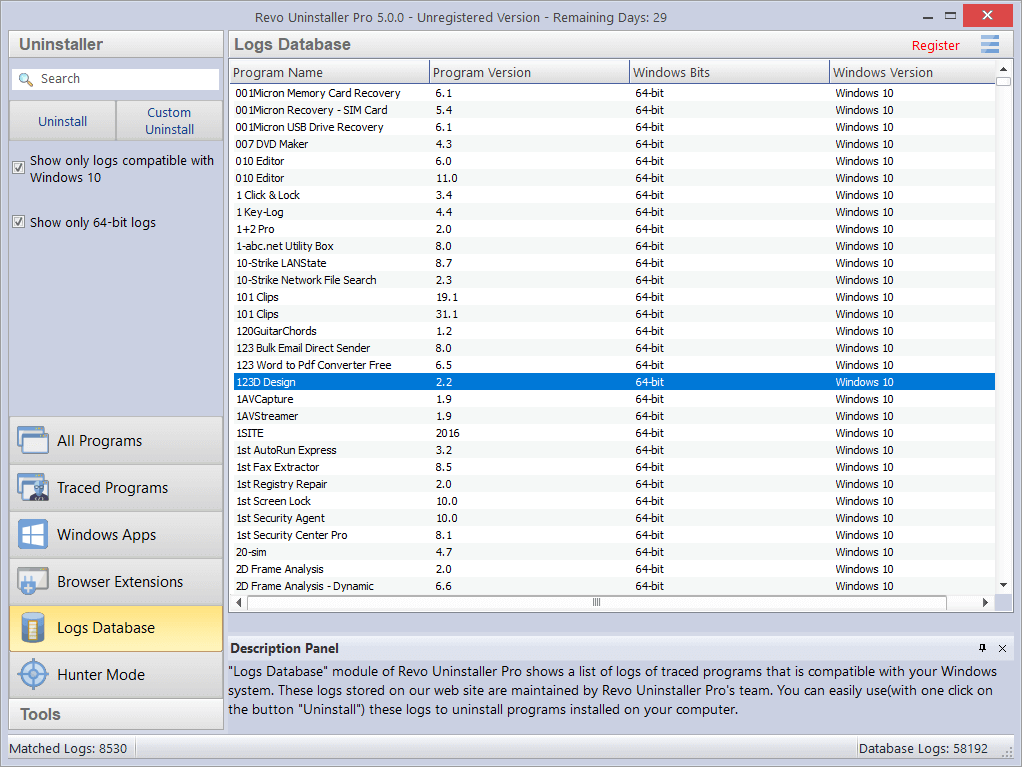
This is a database of logs of traced programs through the monitoring module of Revo Uninstaller Pro. The Logs Database is created and maintained by Revo Uninstaller Pro’s team. The logs are stored on our web server, and you can use them to uninstall programs or to remove leftovers of previously uninstalled program. To start it press its button in the lower part of the Commands Panel.
Using a log from the Logs Database is the same as if you have made the log and traced the program yourself. Therefore, even installing Revo Uninstaller Pro on a computer that already has many installed programs that you had not traced, you can still take advantage of the possibility for better and complete uninstallation using the logs from the Logs Database, as you only have to search for the program you want to uninstall, and select click Uninstall.
When you open the Logs Database, by default you will see a list of logs compatible with your version of Windows. The number on the left side of the status bar indicates how many programs are listed based on the current filter settings and any search terms entered. The number on the right side of the status bar indicates the total number of logs in the Logs Database. The database is updated automatically; however, you can change this behavior in the Options.
Using the Search field in the upper right part of the Commands Panel, you can filter the log list by name. The log list will be filtered in real-time as you type. When searching, the status bar will display the number of found programs that match the search criteria.
Under the Search field, there are two additional options:
- Show only XX-bit logs – where XX-bit is 32-bit or 64-bit, depending on the architecture of your Windows version. When checked, you will only see logs for the corresponding architecture as yours (32-bit or 64-bit). Disabling the option will show logs for both architectures.
- Show only logs compatible with [your Windows version] – when checked, you will only see logs that are made for the same version of Windows as the one you are using. Disabling the option will show logs for all versions of Windows from Windows XP to Windows 10.
In the Logs Database you have only two commands – Uninstall and Custom Uninstall. After you select a program from the list, and click either command, the selected log is downloaded from our website, imported to your own logs, and then the chosen command is executed, as if it is your own log:
- Uninstall – uninstalls the program you have selected from the list using the log from the Logs Database; Revo Uninstaller Pro applies all changes recorded in the log.
- Custom Uninstall – presents you with a wizard with all traced items (first Registry entries in step 1, and then Files and Folders in step 2, and allows you to select the items you want to uninstall.
The procedure is the same as the Custom Uninstall command for Traced Programs, so you can check section 3.2.2 for more information.
For smaller programs, you may use a log for any Windows version in order to uninstall them properly. Therefore, if the program you are searching for is not listed for your specific Windows version, you may try to remove the check mark for the option Show only logs compatible with [your Windows version], and see if the program will appear in the filtered list.
Revo Uninstaller Pro has a very powerful feature called Forced Uninstall. To start it, you must have opened either the All Programs or the Traced Programs module, and click the Forced Uninstall button on the left side. This feature helps you locate and remove leftovers of programs that had been uninstalled previously (before Revo Uninstaller Pro was installed on the computer), or have been incompletely installed or uninstalled, and there are still remnants of on your computer. It does not matter if the program you want to remove is listed in Revo Uninstaller Pro or in the “Programs and Features” and “Apps and features” applets. Forced Uninstall gives power to the user while maintaining the safe and accurate results.
Forced Uninstall requires at least one of two parameters to get the job done: 1) the exact name and/or 2) the full path to the program you want to remove. It is important for the name to be as exact as possible, because Revo Uninstaller Pro searches your entire system, and may falsely detect leftovers if you enter an incomplete or inaccurate name. For example, if you want to remove Microsoft Office Enterprise 2007 you have to enter Microsoft Office Enterprise 2007, and not: Office, MS Office, Microsoft! If for some specific purposes you need to enter more than one name here, you can do that, separating names with a semicolon (;). The second parameter is a path to the main folder of the program and/or to the main executable file (.exe). You can enter the path manually, or you can use the Browse button to locate a file or a folder related to or created by the program you want to uninstall. You can enter multiple paths.
Using the Browse button to locate the program’s executable file (exe) or main installation folder is recommended.
If you want to remove any remnants of a previously uninstalled program, a very efficient way to do that would be to enter the full path to the program’s installation location, if it still exists on the computer.
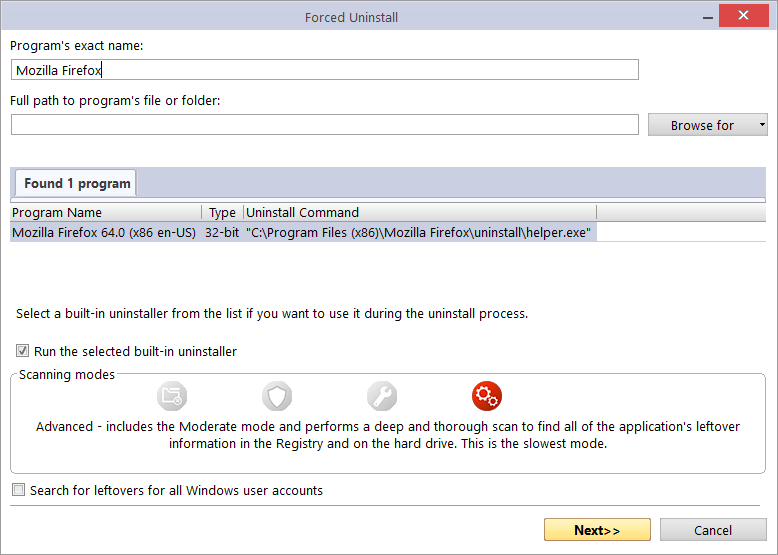
After you enter either of the initial parameters, Forced Uninstall will trigger a search for a built-in uninstaller and any trace logs of the program you want to uninstall. Revo Uninstaller searches for logs based on the entered name among the logs you have in the Traced Programs, as well as the logs in the Logs Database module. If both built-in uninstallers and logs are found, the results are shown in two tabs – Found xx programs and Found xx logs
If there is a built-in uninstaller or several possible uninstallers found, Revo Uninstaller Pro lists them in the same window, so you can choose to run one of them.
If there is at least one log found based on the name you have entered, it is listed with the following information:
- Name – name of the log, usually the name of the program.
- Program Version – if the log is from the Logs Database, you will see its version, which can help you decide if it is appropriate for your case.
- Windows Version – the version of Windows, on which the log is made; also to help you to decide if it is appropriate for you to use the log.
- Source – whether the log was found among your local logs in Traced Programs, or in the Logs Database module.
If you want to run the built-in uninstaller before scanning for leftovers, just select the option Run selected built-in uninstaller checked, and click Next. Revo Uninstaller Pro will try to run the built-in uninstaller as usual, and after it finishes, you will have to click the Scan button to continue the uninstallation process with Revo Uninstaller Pro by scanning for leftovers. Note that the built-in uninstaller may show up behind other open windows so you may need to cycle between them by using the Alt+Tab key combination – hold the Alt key and press the Tab key.
If you decide to use a log in the uninstallation process, you must select it, and make sure the Use selected log option beneath the list of found logs, is checked, and then click the Next button. That will open a window where Revo Uninstaller Pro first creates a full Registry backup and a System Restore Point (unless their creation is disabled in Options -> Uninstaller), and then loads selected log data, showing the Registry entries in the first step, and the files and folders in the second one.
If neither the built-in uninstaller nor a log is used, clicking the Next button will still proceed to create a full Registry backup and a System Restore Point (unless their creation is disabled in Options -> Uninstaller), but after that it will initiate a regular leftover scan instead.
Note: for Revo Uninstaller Pro to be able to use a trace log from our Logs Database, an Internet connection is required.
Revo Uninstaller Pro shows found leftover Registry entries first. Registry keys and values found as created by the uninstalled program are in bold. Entries that are NOT in bold are considered as not created by the uninstalled program. You can safely check them (leave them checked), as they will not be deleted! Entries not in bold are displayed for two reasons: 1) for information: to give you a better idea of the tree structure, and 2) to make selecting leftovers for deletion easier and faster. You can simply check an entire parent branch, as that will automatically select all of its children. This eliminates the need to check each individual leftover item manually and separately. So, again, whatever items you check, when you press the Delete button, only entries that are checked and in bold will actually be deleted. This applies to when the Select All button is used as well.
Deleted Registry entries are backed up, so if you need them later you can restore them using the Backup Manager.
You can bring up a context menu by right clicking. These are the available commands:
- Expand All – expands all items in the Registry tree – by default it is expanded so you should not see any difference the first time you use this command.
- Collapse All – collapses all items in the Registry tree.
- Export All – export shown leftover data to an HTML file.
- Expand selected key – expands the selected key and its sub items.
- Collapse selected key – collapses the selected key and its sub items.
- Uninstall selected key – deletes the selected key from the system.
- Mark selected key as Created – marks the selected key as created by the program you are uninstalling. This feature is useful when you see a Registry key, which you are sure is created by the program but is not marked as created because of the safety algorithms in Revo Uninstaller Pro.
Warning: Be very careful using this command. Mark the key only if you are absolutely certain that it belongs to the uninstalled program!
- Add to Exclude List – adds the selected key to the exclude list, which protects the key from deletion, and marks it in red. You can edit the exclude list from the Options in Revo Uninstaller Pro.
- Open Registry Key – opens the selected Registry key in the Windows Registry Editor (regedit.exe).
After removing the Registry leftovers, you can click the Next button, and continue to the file and folder leftovers. Note that the Next button may not be available if there are no other leftovers found.
Revo Uninstaller Pro shows you found leftover files and folders so you can check the results, and delete the ones you want. Revo Uninstaller Pro also displays the number of files and folders found, as well as their total size on the drive.
In case you want to change the scanning mode, or you have not deleted all Registry items you can click the Back button, and return to the previous step.
Deleted files and folders are moved to the Recycle Bin by default, so you can recover them from there. You can change that option in Options -> All Programs.
You can bring up a context menu by right clicking on a file or folder:
- Open – acts the same way as if you double clicked on the file or folder in Windows Explorer. Note that if there is no program associated with the file, nothing will happen.
- Properties – acts the same way as if you right clicked on a file, and chose Properties – shows various properties like file size, attributes, date of creation, modification, etc.
- Open Containing Folder – opens the folder that contains the selected item in Windows Explorer.
- Export – exports the list of found leftover files and folders to an HTML file.
You can use Select All button to select all found leftover files and folders at once and then use Delete button to delete them.
This feature takes just a few seconds to start, and then monitors program installs in real-time. It detects and records all system changes. This record is called a Traced Log.
- Only install one program at a time
- Do not run or start any other programs during the installation. However, you do not need to stop any programs already running.
You have two Install options:
- Right click the program setup file, select Install with Revo Uninstaller Pro
- Start Revo Uninstaller Pro and in either the All Programs or Traced Programs modules, select the Install Program with Revo Uninstaller Pro command, and browse to the program setup file.
The program install will start as normal and a toolbar will appear at the top of your screen.

 TIP: You can switch the wide toolbar (Trace Bar) to a smaller one. Menu -> Options -> Traced Programs -> Trace programs in compact mode.

- Complete the program install as usual, then immediately run and configure it. Repeat configure for any other program components. Close the newly installed program.
- Click the Stop button on the Trace Bar. Revo Uninstaller Pro will suggest a name for the log. Keep or change the name as you wish, and click the Save button. This name will be detailed in the Traced Programs module.
Hunter mode is an innovative and flexible feature of Revo Uninstaller Pro, which gives you the ability to uninstall, stop, or delete simply by pointing to application icons on the Desktop or system tray, or opened application windows. This can be very useful because many applications loading on start-up and/or remain in the system tray without your consent, or you do not even know which application that is.
To start it click the Hunter mode button in the lower part of the Commands Panel. When you click the button, the Revo Uninstaller Pro’s window will disappear, and a small blue target icon with a crosshair will appear at the upper right corner of your screen. Hunter mode is now activated.
Right clicking the target icon brings a context menu with the following options:
- Open main window – exits Hunter mode, and re-opens Revo Uninstaller Pro’s main window.
- Auto Start with Windows – sets Hunter Mode to start automatically with Windows.
- Window’s size – allows you to change the size of the target icon to small, medium or large.
- Transparency – allows you to set the level of transparency of the target icon (default is 50%).
- Help – opens Revo Uninstaller Pro’s help file.
- EXIT – closes Revo Uninstaller Pro entirely.
To operate in Hunter mode you simply need to drag and drop the target icon over the icon or window of the program you want to manage.
Here is a more detailed description:
- Press and hold the left mouse button over the target icon.
- Move the target icon with the mouse over an item supported by the Hunter mode (a Desktop shortcut, an icon in the system tray, opened window, etc.). While doing so, a tooltip is shown with information about the application you would select if you released the button.
- After moving the icon over the desired item, release the left mouse button and a menu will appear.
- Select a desired command from that menu:
- Uninstall – starts the Forced Uninstall module of Revo Uninstaller Pro;
- Stop Auto Starting – disables the application from automatically starting with Windows.
- Kill – forcibly stops/closes the application.
- Kill and Delete – forcibly stops, and deletes the application.
- Open Containing Folder – opens the folder containing the selected program in Windows Explorer.
- Search at Google for – use it to search online using Google for the program’s name or publisher. This will open your default web browser and display the results of the search.
- Properties – show the application executable file’s properties.
- Cancel – cancels the operation.
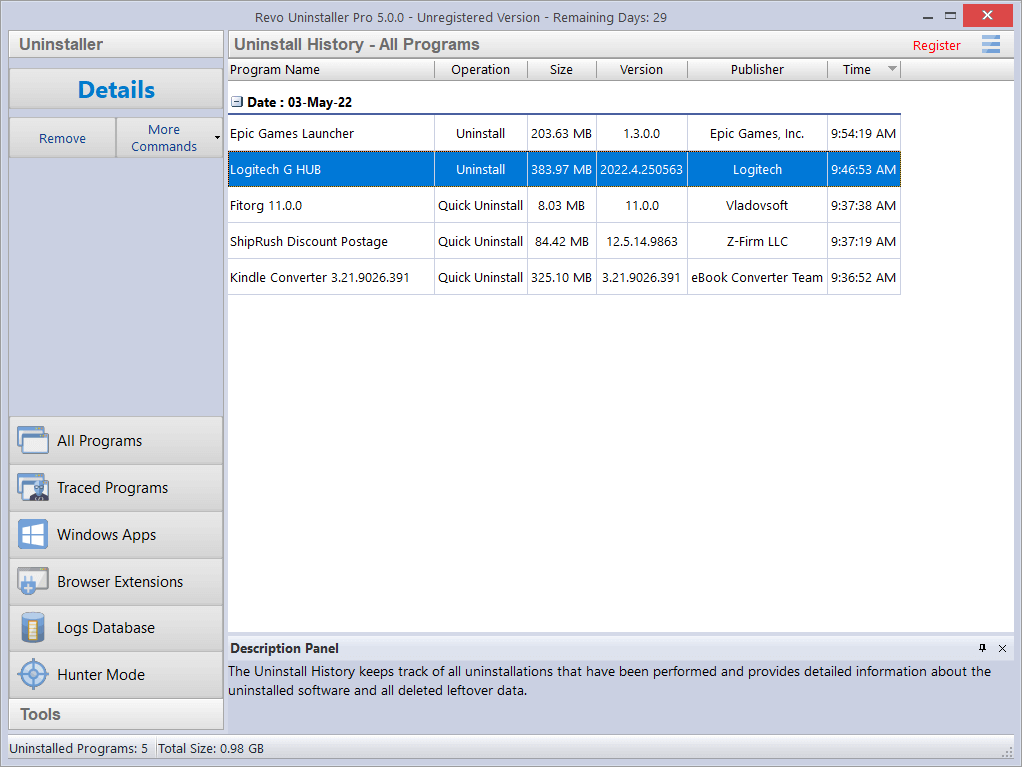
Revo Uninstaller Pro keeps detailed records about uninstalled programs and apps in a new section called Uninstall History. It can be accessed from the More Commands button in each module where it is applicable – All Programs, Traced Programs, and Windows Apps.
The records in the Uninstall History are grouped by date, and then further sorted by time. Each record indicates the operation used to uninstall the software (e.g. Uninstall, Forced Uninstall, Trace Log, etc.).
For programs that use MSI (Microsoft Installer), the built-in uninstaller of a program selected for removal will also contain a Change or Repair command, and if they exist, can be seen in the More Commands menu. Executing either command for the program chosen to be removed will open a window and let you either change the installed components of the program, or repair its installation in case it does not work properly.
Sometimes the built-in uninstaller will automatically run one of these commands, even though you wish to uninstall the program. Don’t worry. First, simply cancel both the programs’ built-in uninstaller and Revo Uninstaller Pro’s uninstall wizard. Secondly, re-select the program to be removed, but this time use the Forced MSI Uninstall command that can be found by opening the context menu of the MSI program.
Then follow the procedure in All Programs module Uninstall.