Upon starting the program, the Registry Cleaner module is activated by default and you can start scanning for unnecessary, obsolete, or broken Registry entries by clicking on the available scanning modes or executing the one-click operation “Quick Clean” that will scan your Registry, backup and clean all found issues without any more interaction from the user. In case you want to review found issues and control the cleaning process, there are three scanning modes based on how deep and complex you want the scan to be and a “Managed” mode that lets you choose areas of Registry leftovers to scan for.
Safe mode – the basic and fastest scan mode, that scans the common keys and values in Registry where unnecessary items may exist. It is recommended for beginners or users without any knowledge related to Windows Registry.
Moderate mode – the balanced mode, includes the Safe mode and performs an extended scan for unnecessary Registry items.
Advanced mode – includes the Moderate mode and performs a deep and thorough scan for unnecessary Registry items.
Managed mode – lets you choose the categories of Registry items to scan for based on their type and location.
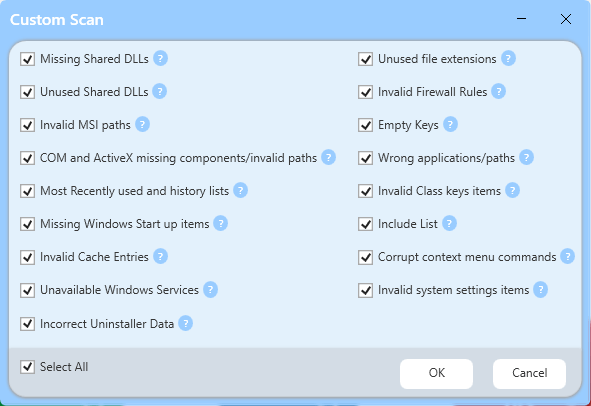
Categories available in the Managed mode are:
- Missing Shared Dlls – lists Shared dynamic-link libraries that do not exist on the system
- Unused Shared Dlls – lists Shared dynamic-link libraries whose usage counter is set to 0
- Invalid MSI paths – lists missing files and folders related to Microsoft software installer-based installations
- COM and ActiveX missing components/invalid paths – lists invalid registrations of COM and ActiveX components where file and related data is missing.
- Most Recently used and history lists – lists history of recently accessed files, visited paths, etc. in common Windows dialogs and programs.
- Missing Windows Start-up items – lists invalid paths of missing applications/services/files set to start up with Windows.
- Invalid Cache entries – lists cache entries that are no longer valid due to missing file/folder
- Unavailable Windows Services – lists data of corrupted Windows services due to missing files
- Incorrect Uninstaller Data – lists some invalid and useless uninstaller information
- Unused file extensions – lists file extensions that are not associated with any program
- Invalid Firewall Rules – lists Windows Firewall rules related to missing files or invalid paths
- Empty keys – lists some software-related keys that do not contain any data
- Wrong applications/paths – lists invalid data related to missing application paths and files
- Invalid Class keys items – lists useless items related to invalid file types data and corrupted components with missing file/folder
- Include list – lists all data from items set in Options-> Registry Cleaner-> Include List
- Corrupted Context menu commands – lists data related to context menu commands that will not work due to not existing file/folder
- Invalid System settings items – lists missing system settings items – sounds, themes, etc
By default, the Registry is scanned only for the current user, but by clicking on the icons below the command buttons you can choose to scan the Registry for all users. After the scanning process has completed a tree with found Registry items. Parent nodes in bold are the categories with the number of found items in brackets. All found items in a category are presented as its sub-items. If you want to see the full path in the Registry of a found item you must expand it. If the found item is data of a Registry value you will see the Registry key and the value separated with a slash like this |.
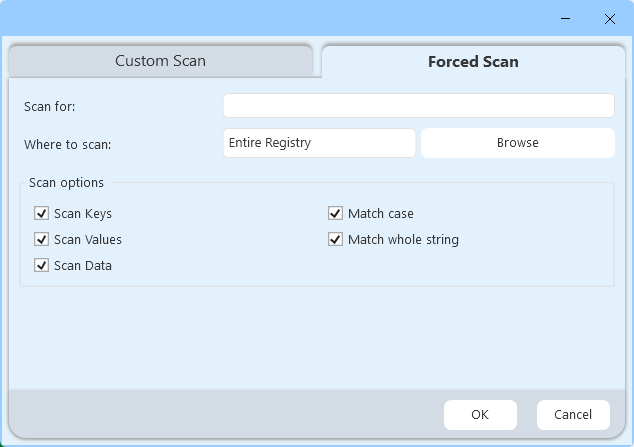
Forced Scan An additional mode, which allows you to choose a specific location to search for in the Windows Registry, as well as for a specific word/part of a phrase/name.
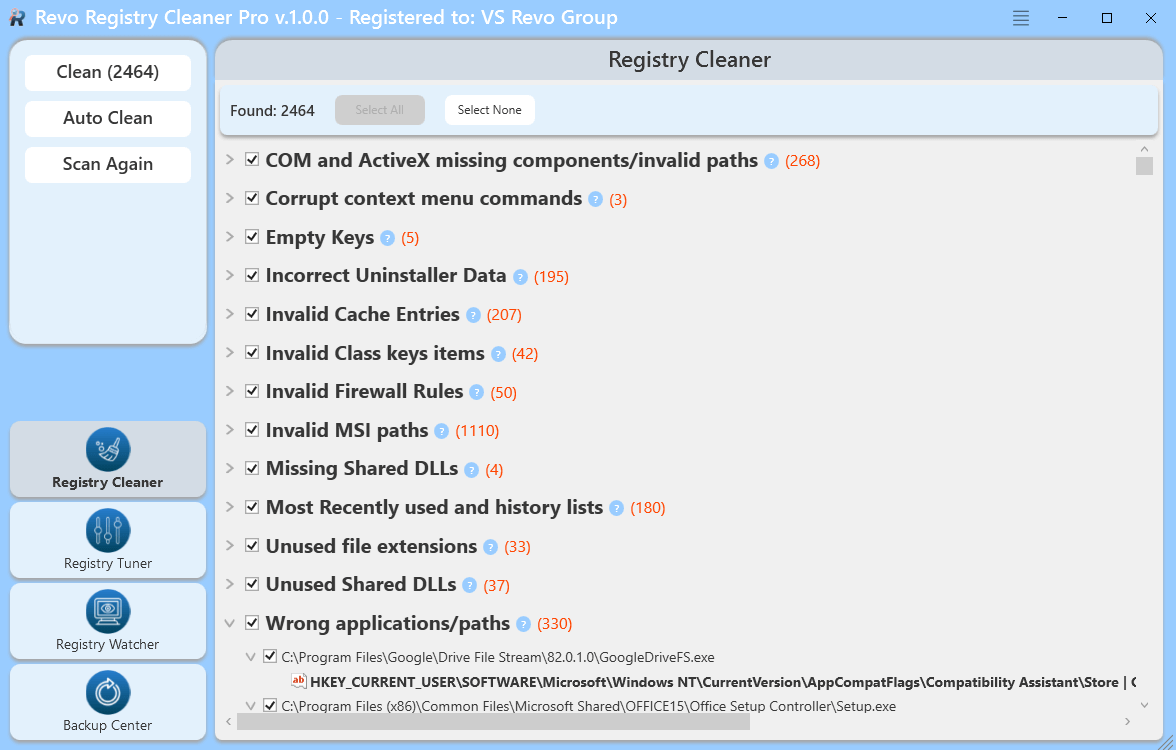
On the top of the screen with found items, you will see the total number of found items and a button that allows you to select or deselect all items in the list. You can also click on the check mark in front of any item to select or deselect it.
Right-click any item to open a context menu to help manage your decision-making. Most options are self-explanatory, but note the following:
- Unselect This – Removes the check mark on current item
- Select All – Selects all items in the list
- Select None – Deselects all items in the list
- Collapse All – Collapses the tree to the main items (categories)
- Expand All – Expands all parent items in the tree so their children become visible
- Expand to Data – Expands the whole tree, so all data is visible
- Open in Registry Editor… – opens the key in the Windows Registry (regedit.exe)
- Add to exclude list – adds the selected key to protect from deletion. You can edit the exclude list from the Options
- Export List to – export the data to TXT, HTML, CSV, XML, and XLS
After you have selected the items you want to delete, you must press the Clean button in the left commands panel. The Clean button shows you in brackets the total number of selected items from the tree.
Clicking on the Clean button you will be asked if you want to make a System Restore and Full Registry backup before the procedure of deleting unnecessary Registry items. By default, all deleted Registry items are backed up. Made backups are stored in the Backup Center.
Note: if the option Skip warning messages shown by Revo Registry Cleaner is unchecked you won’t be asked for the creation of System Restore and Full Registry backup, but the corresponding options in Options-> Registry Cleaner-> General will be used to determine, which backup will be done.
If you want to do a new scan press the Scan Again button in the Commands Panel. That will show you the home screen of the Registry Cleaner where you can choose the scanning mode.
You can automate the process of scanning and cleaning your Registry using the command Auto Clean from the Commands Panel on the left.
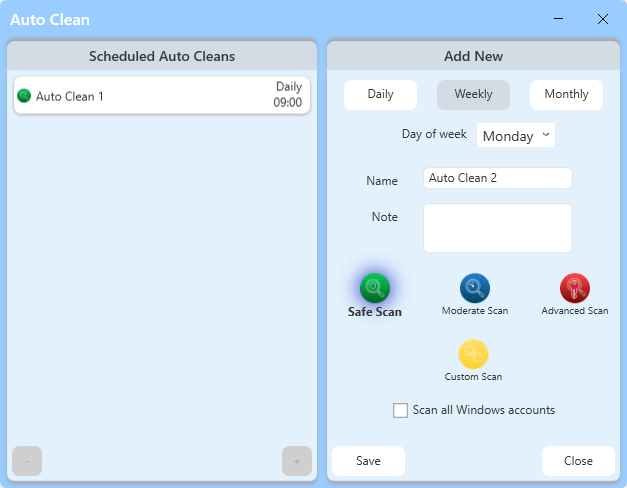
Once the command is executed you are shown a window divided into two parts. The left part shows a list of saved scheduled Auto Cleans, and the right part allows you to create and save a scheduled Auto Clean with different parameters, based on your needs. Every saved scheduled Auto Clean has a Name, you may write a Note and adjust if the clean operation is to be Daily at a specific time, Weekly at a specific day of the week, or Monthly at a specific date of any month. You can choose which scan mode to use for the scanning process and if only data for the current user account is to be cleaned or for all user accounts. Once the button Save is clicked the Auto Clean is saved and listed in the left part of the Auto Clean window. To Edit already saved and listed Auto Cleans, just select it from the list, and from the right part of the window, all parameters can be edited and re-saved. To Delete an Auto Clean select it from the list and click the “-” button in the lower-left corner of the window.
While your computer is running after a successful Auto Clean operation when some invalid data is cleaned you will be shown a small notification that appears in the lower-right part of the desktop window for a few seconds to notify you which Auto Clean operation has successfully completed and what are the results.