
Navigating and modifying the Windows Registry is a task that requires precision and expertise. This centralized database holds critical configurations for both the Windows operating system and installed applications. Understanding how to create, edit, and delete registry keys empowers advanced users and system administrators to fine-tune their systems. However, it’s paramount to approach these operations with utmost care, as incorrect modifications can lead to system instability. In this guide, we’ll explore each of these processes in detail, providing insights and precautions for effective registry management.
How to Create a Windows Registry Key?
Creating a new Windows Registry key is a process that grants advanced users and system administrators the ability to customize their system to a greater extent. Here are some additional details to consider:
- Choosing the Right Location:
- Before creating a new key, it’s crucial to determine the appropriate location within the registry. Selecting the correct parent key ensures that the new key is organized logically and serves its intended purpose.
- Key Naming Conventions:
- When naming a new key, it’s advisable to use descriptive and meaningful names that clearly indicate its function. This helps in easy identification and management of keys in the future.
- Creating Subkeys:
- In addition to creating new keys directly under the root, users can also create subkeys within existing keys. This hierarchical structure allows for further organization and categorization of registry entries.
Here are the steps for creating a Windows Registry Key?
- Open Registry Editor:
- Press Windows Key + R, type “regedit”, and press Enter.
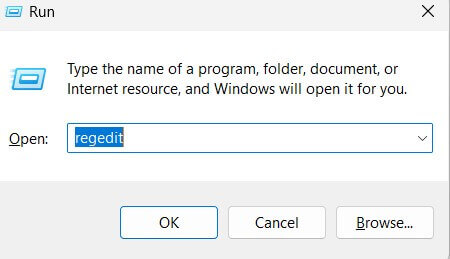

- Press Windows Key + R, type “regedit”, and press Enter.
- Navigate to the Desired Location:
- Use the Registry Editor to browse to the location where you want to create the new key.
- Right-Click and Select “New”:
- Right-click on the parent key, hover over “New”, and choose “Key”.
- Name the New Key:
- Give the new key a descriptive name that reflects its purpose.
- Press Enter to Confirm:
- Press Enter on your keyboard to create the new key.
How to Edit Windows Registry Key?
Еditing a Windows Registry key is a powerful way to fine-tune system settings to suit specific preferences or resolve issues. However, it’s essential to proceed with caution to avoid unintended consequences. Here are some additional considerations:
- Understanding Key Types:
- Registry keys can contain values of various types, including strings, integers, and binary data. It’s important to be familiar with these types and their respective purposes when making edits.
- Value Editing Options:
- When editing a registry value, users can modify data directly or use specialized editors depending on the value type. For example, string values can be edited as text, while binary values may require specific tools.
- Creating Backups:
- Before making any changes to a registry key, it’s highly recommended to create a backup. This ensures that the original settings can be restored in case of any unexpected issues arising from the edits.
Editing a Windows Registry key allows for customization and fine-tuning of system settings. However, it’s crucial to approach this with caution. Follow these steps:
- Open Registry Editor:
- Press Windows Key + R, type “regedit”, and press Enter.
- Locate the Key to Edit:
- Navigate to the specific key you wish to edit.
- Double-Click the Key or Value:
- Double-click the key or value you want to edit.
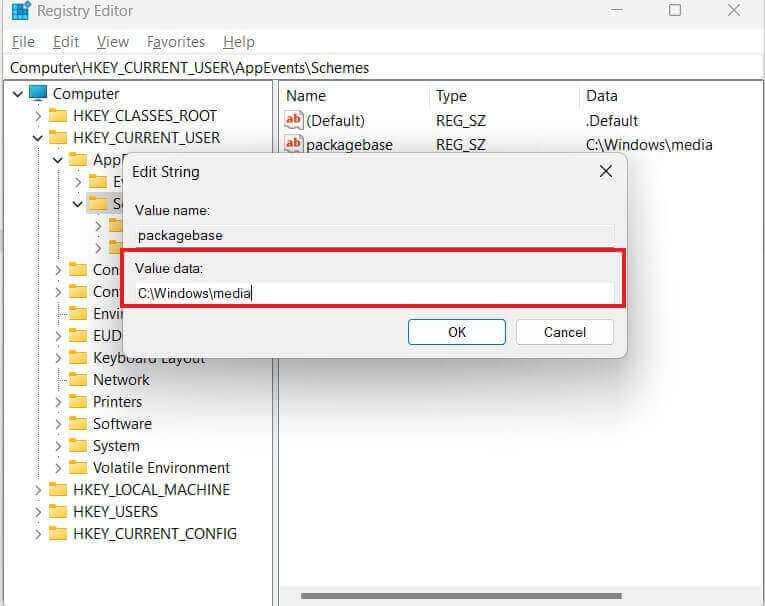
- Double-click the key or value you want to edit.
- Make the Necessary Changes:
- In the window that appears, make the desired changes to the key or value.
- Save the Changes:
- Click “OK” to save the changes.
How to Delete Windows Registry Key?
Deleting a Windows Registry key is a delicate operation that should be approached with extreme caution. It’s important to thoroughly assess the implications and ensure that the key to be deleted is indeed unnecessary. Here are some additional considerations:
- Recursive Deletion:
- When deleting a key, it’s important to note that all subkeys and their respective values will also be permanently removed. This can have far-reaching consequences, so careful consideration is crucial.
- Verification:
- Before confirming the deletion, the user may be prompted to confirm the action. This serves as an additional safeguard against accidental deletions.
- Backup as a Precaution:
- Prior to deleting any registry key, it’s highly recommended to create a backup. This is a critical step to ensure that the system can be restored to a stable state in case of any unforeseen issues arising from the deletion.
Here are the steps:
- Open Registry Editor:
- Press Windows Key + R, type “regedit”, and press Enter.
- Navigate to the Key to Delete:
- Use the Registry Editor to find the key you wish to delete.
- Right-Click the Key:
- Right-click on the key you want to delete.
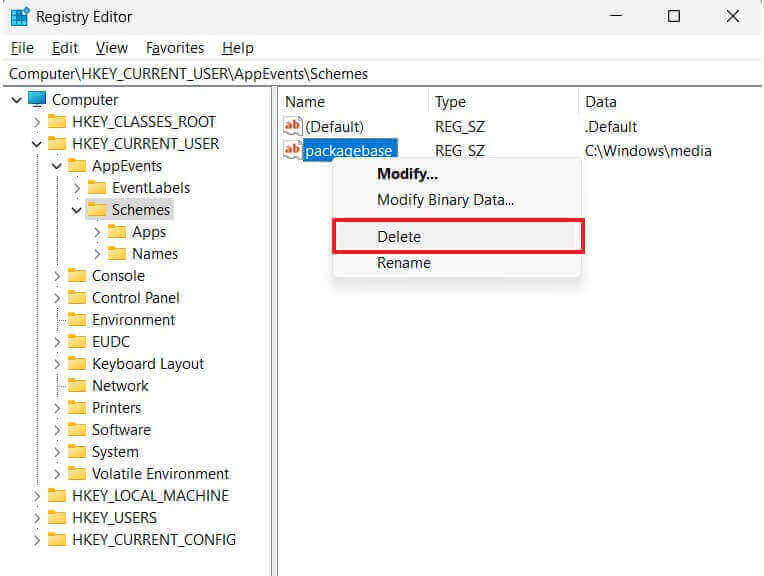
- Right-click on the key you want to delete.
- Select “Delete”:
- Click “Delete” and confirm the action if prompted.
- Proceed with Caution:
- Be certain that you want to permanently delete the key, as this action cannot be undone.
Summary
The Windows Registry is a vital component of the Windows operating system, housing critical configurations for both the system and installed applications. Knowing how to create, edit, and delete registry keys allows for advanced customization and troubleshooting. However, it’s crucial to exercise caution when making changes to the registry, as incorrect modifications can lead to system instability or even prevent Windows from booting. Always backup the registry or specific keys before making any changes, and consider consulting with a professional for critical system-wide modifications.
1 Comment
Great article! Working with the registry can be a daunting task, but thanks to this article, I now have a clear understanding of how to edit, delete and create keys. Thank you so much for the detailed instructions and clear explanation of the process!