

How to completely uninstall CPUID ROG CPU-Z
CPU-Z ROG represents a customized version of CPU-Z, dedicated to ROG (Republic of Gamers) motherboards found on ASUS devices.
Do you experience difficulty when you try to completely uninstall CPUID ROG CPU-Z from your system?
Are you looking for an easy solution to thoroughly remove it from your computer?
This guide is the right solution to completely uninstall CPUID ROG CPU-Z without any difficulty.
What usually makes people to uninstall CPUID ROG CPU-Z?
It seems that there are many users who have difficulty uninstalling programs like CPUID ROG CPU-Z from their systems. Some experience issues during uninstallation, whereas other encounter problems after the program is removed.
These are the main reasons why CPUID ROG CPU-Z is uninstalled by users:
- The program is not compatible with other installed applications.
- The program crashes or hangs periodically/frequently.
- The program is not as good as the user expected.
- The program is being re-installed (uninstalled and installed again afterwards).
- The program is regarded by the user and/or some websites as a potentially malicious.
- The program is not listed in the Windows Settings or Control Panel.
- After removing the program, some of its related processes still run on the computer.
- Some traces of the program can still can be found on the computer.
- Removing process running for a long time and does not come to the end.
Possible problems that can arise during uninstallation of CPUID ROG CPU-Z
- The program’s built-in uninstaller does not start or does not operate properly.
- A file required for the uninstallation to complete could not be run.
- Due to an error, not all of the files were successfully uninstalled.
- Another process is preventing the program from being uninstalled.
There could be other causes why users may not be able to uninstall CPUID ROG CPU-Z. An incomplete uninstallation of a program may cause problems, which is why thorough removal of programs is recommended.
How to uninstall CPUID ROG CPU-Z completely?
Method 1: Uninstall CPUID ROG CPU-Z with a third-party uninstaller.
- 1
- 2
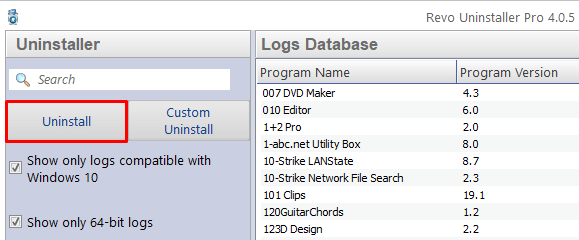
Start Revo Uninstaller Pro and open the module "Logs Database"


- 3
In the Search field type "CPUID ROG CPU-Z" and you will see all logs of "CPUID ROG CPU-Z" in the database compatible with your Windows Version.
- 4
Select the appropriate log by version from the list and press the "Uninstall" button from the toolbar
- 5
You will see few popping up windows showing the download and import of the log to your Revo Uninstaller Pro and then the main Uninstall dialog that shows the progress of the uninstall of CPUID ROG CPU-Z.
Method 2: Uninstall CPUID ROG CPU-Z via Apps and Features/Programs and Features.
- 1
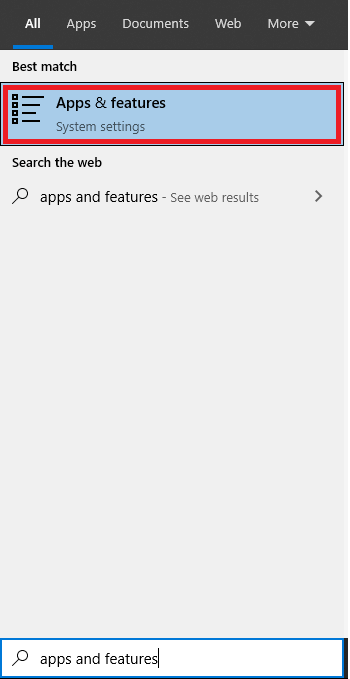
Open the Start Menu and type Apps and Features
- 2
Look for CPUID ROG CPU-Z in the list and click on it. The next step is to click on uninstall, so you can initiate the uninstallation.

Method 3: Uninstall CPUID ROG CPU-Z with its uninstaller.exe.
Most of the computer programs have uninstall.exe or uninst000.exe in their installation folders. You need to execute these files in order to start the uninstallation process. Here are the steps:
- 1
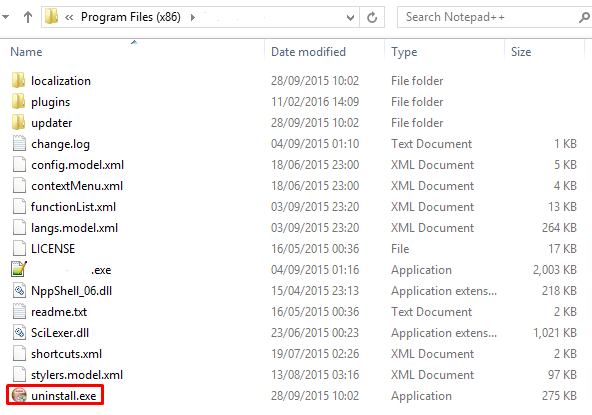
Go to the installation folder of CPUID ROG CPU-Z. Most of the times it is located in C:\Programs files or C:\Program files(x86)
- 2
Locate uninstall.exe or uninst000.exe
- 3
Double click the file to start the uninstallation process.
Method 4: Uninstall String with Run
- 1
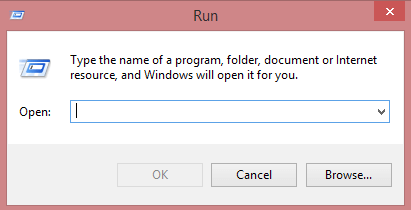
Hold the Windows + R keys to open the Run command.
- 2
this uninstallation string
"C:\Program Files\CPUID\ROG CPU-Z\unins000.exe"
and paste it in the Run command window and click OK. - 3
Follow the instructions to complete the uninstallation.
We can help you every time when…
- you cannot find the program in the Apps & Features list
- the program's built-in uninstaller is non-functional
- you have a lot of leftovers slowing down your computer's performance
- you want to batch uninstall
- many more things